🔥 React + Typescript Boilerplate to develop your own react components and reuse in another projects
Motivation
Components are cool! We should use them everywhere. So, you expent time developing a lot of components and now you want to reuse them in another awesome project & all your projects need your components updated when a new feature is released (and you also need typechecking, tests, hot module replacement & all the good stuff).
Directory Structure
.
├── src
|   └── components
|       └── MyComponent                 # Your component
|           ├── MyComponent.story.tsx   # Storybook of your component
|           ├── MyComponent.test.tsx    # Jest + Enzyme tests
|           ├── MyComponent.tsx         # Its JSX + Typescript file
|           ├── MyComponent.types.ts    # Types for props
|           └── index.ts                # Export Component
|       └── MyComponentX                # Another component X
|       └── MyComponentY                # Another component Y
|       └── MyComponentZ                # Another component Z
|       └── stories.tsx                 # Storybook config file
├── dist
|    └── index.js                       # Exporting all Componentss
Usage
Fork it!
install dependencies:
yarn install
Create your account in TravisCI & Code Coverage
Configure TravisCI environment variables DANGER_GITHUB_API_TOKEN, GH_TOKEN & NPM_TOKEN with right permissions (you can find in their websites) for repo access to release new versions & intercept in pull requests
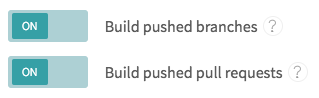
Make sure you have these options checked in TravisCI:
🔥 React + Typescript Boilerplate to develop your own react components and reuse in another projects
Motivation
Components are cool! We should use them everywhere. So, you expent time developing a lot of components and now you want to reuse them in another awesome project & all your projects need your components updated when a new feature is released (and you also need typechecking, tests, hot module replacement & all the good stuff).
Directory Structure
.
├── src
|   └── components
|       └── MyComponent                 # Your component
|           ├── MyComponent.story.tsx   # Storybook of your component
|           ├── MyComponent.test.tsx    # Jest + Enzyme tests
|           ├── MyComponent.tsx         # Its JSX + Typescript file
|           ├── MyComponent.types.ts    # Types for props
|           └── index.ts                # Export Component
|       └── MyComponentX                # Another component X
|       └── MyComponentY                # Another component Y
|       └── MyComponentZ                # Another component Z
|       └── stories.tsx                 # Storybook config file
├── dist
|    └── index.js                       # Exporting all Componentss
Usage
Fork it!
install dependencies:
yarn install
Create your account in TravisCI & Code Coverage
Configure TravisCI environment variables DANGER_GITHUB_API_TOKEN, GH_TOKEN & NPM_TOKEN with right permissions (you can find in their websites) for repo access to release new versions & intercept in pull requests
Make sure you have these options checked in TravisCI:
Runs the app in the development mode.
Open http://localhost:3000 to view it in your browser.
The page will reload when you make changes.
You may also see any lint errors in the console.
npm test
Launches the test runner in the interactive watch mode.
See the section about running tests for more information.
npm run build
Builds the app for production to the build folder.
It correctly bundles React in production mode and optimizes the build for the best performance.
The build is minified and the filenames include the hashes.
Your app is ready to be deployed!
See the section about deployment for more information.
npm run eject
Note: this is a one-way operation. Once you eject, you can’t go back!
If you aren’t satisfied with the build tool and configuration choices, you can eject at any time. This command will remove the single build dependency from your project.
Instead, it will copy all the configuration files and the transitive dependencies (webpack, Babel, ESLint, etc) right into your project so you have full control over them. All of the commands except eject will still work, but they will point to the copied scripts so you can tweak them. At this point you’re on your own.
You don’t have to ever use eject. The curated feature set is suitable for small and middle deployments, and you shouldn’t feel obligated to use this feature. However we understand that this tool wouldn’t be useful if you couldn’t customize it when you are ready for it.
Use this to easily build your hakyll websites using nix flakes.
hakyll-flakes.lib.mk* takes in a set with the following fields:
system: the system to build for.
name: the name of website. this must also be the name of the haskell project and executable generated.
src: the source directory (usually ./.), which must contain at a minimum your package.yaml or project-name.cabal file.
websiteBuildInputs (optional): any runtime inputs the builder needs to build the website.
hakyll-flakes.overlay is the overlay that hakyll-flakes uses internally to get hakyll working (this will not work on an arbitrary version of nixpkgs), and hakyll-flake.pkgs is the legacyPackages that hakyll-flakes uses internally (this should always work). If you want to use one consistent nixpkgs set, you can set websiteBuildInputs = with hakyll-flakes.pkgs.${system}; [ ... ]. Alternatively, you can use your own nixpkgs set for these inputs, there’s no reason they need to be the same.
name: my-website

dependencies:
    - base
    - hakyll
    - filepath
    - pandoc
    - containers
    - time
    - pandoc-types
    - hakyll-sass
    - process
    - bytestring
    - uri-encode
    - text
    - time-locale-compat

executable:
    main: site.hs
Then from the top level directory you can run a few different commands:
nix build .#website (or just nix build) this goes through the whole process for you and simply produces a result/ symlink with your compiled website inside.
nix build .#builder this builds the website builder, your hakyll-based site.hs file. You can find it at result/bin/<project name>.
nix run . -- watch This will compile and run your website builder, creating the _site directory and loading the website at localhost:8000. It will also rebuild the website if you change the files (but not if you change site.hs)
You can pick out the individual outputs you want with mkBuilderPackage, mkWebsitePackage, mkDevShell, and mkApp.
An Embedded Systems and IoT 2nd Semester Project | Ease your class workflow by automating classroom access without the need of staff to open them for you. (Unless, you want to open parts of the room that is not designed to be accessed to you…)
Welcome
Hello! This is a repository dedicated to show the concept of a bare minimum IoT to server interaction and implementation. The concept consists of the system itself (excluding only the physical side of the project) which this concludes the context as the Smart Classroom System. It has the capability to reduce time consumption upon entering rooms that are authorized within the scope of a particular time.
The Problem
Most of the day, one of the problems that the teacher and students always encountered when the class starts is the classroom locked. Sometimes, when your class is at 7:30 AM, it’s safe to assume that your classroom is not yet opened. The fact that, any staff who is under those rooms are either late or literally just missing, for instance (breaktime, went out to go somewhere, etc.). Since, some of them never really learn. We have to do something about it. As those issues occur within the technology building. It’s best to suit all classrooms with smart padlocks and other such. But the thing is, it is quite simple. So we have to come a more complex idea from the smart padlocks.
The Solution
The solution was to create a Smart Classroom. The context was not all about the locks being smart padlocks. But rather, we should be able to control the whole classroom itself! From locks to electricity to environmental states. This kind of solution looks typical when looked from the outside. But if you look in the system itself, it is quite complex to do so, as it involves time and subject included and user fingerprint assignments.
How does it work
The following consists of various sections in regard on how this system works.
The Context
So basically, we want something to automate, right? The group managed to think of something that would help the techno core building of their school to be more technology-dependent. That is by, making all instructional rooms to be accessible without any on sight staff but only the authentication within your hands.
The Wide Range of How It Works
So, how does it really works!?. In this system, we have a server and a client. The server can be Raspberry Pi 4B or any Server Computer and the Client is the NodeMCU. The server contains an accessible website to be used by staff and professors. The client which those are nodes, act as a receiver and status transmitter. Everytime there is a change in the classroom, the NodeMCU prepares the states in Dictionary Form everytime the server wants to query on the Nodes. Then the server process that state and assign those values in the database. Other than that, the server has the capability to send requests to the Nodes to change particular attributes of it. Such as the subject code to be assigned in front of the screen, explicitly change electricity and lock state without any authentication (exclusive for administrators only!).
Table of Contents
This are the README Sections and Subsections. You can navigate through by clicking in one of those…
This repository contains a lot of varieties. Meaning you really have to know the path you’re going before navigating any further without realizing where the heck are you even going… Just read it in a bare-minimum way and you will be fine 💯
. <Repo Root Folder>/
├── .dependabot/ # Contains Dependabot Dependency Configuration...
│   └── config.yml
│
├── .github/ # Contains Workflow File...
│   └── workflow/
│       └── SketchWorker.yml # It is a sketch validator and worker. It outputs whether those sketches inside of the folder `NodeSketch_SC` will work or uploadable in MCU's memory.
│
├── .vscode/ # VSCode configuration.
│   └── *.json
│
├── Externals/
│   ├── AdLibs/ # Contains set of text refining multiple non-understandable context by talking to self on how to do it in text form. | Specifically made for CodexLink
│   │   └── *.md
│   │
│   ├── Commands/ # Contains only few preset commands that can be used to certain extreme conditions.
│   │   └── *.txt
│   │
│   ├── Project Plan/ # It consists of important notes to look up from what should be context of the project.
│   │   └── * .md
│   │
│   └── Sketch/
│       └── NodeSketch_SC/ # Specifically for NodeMCU Sketches.
│           ├── *.cpp
│           ├── *.h
│           └── *.ino
│
├── SmartClassroom/ # Django Project Folder
│   ├── DataSetBackups/
│   │   └── *.json
│   │
│   ├── NodeHandler/ # Django Micro App. This acknowledges any IoT MCUs by their own POST requests. This app could make changes to the databases.
│   │   ├── migrations/
│   │   │   ├── __pycache__/
│   │   │   │   └── *.pyc
│   │   │   │
│   │   │   └── __init__.py
│   │   │
│   │   ├── __init__.py
│   │   ├── apps.py
│   │   ├── urls.py
│   │   └── views.py
│   │
│   ├── SCControlSystem/ # Django Main Web App. This renders EVERYTHING that any user could access to...
│   │   ├── externs/
│   │   │   ├── __pycache__/
│   │   │   │   └── *.pyc
│   │   │   │
│   │   │   └── __init__.py
│   │   │
│   │   ├── management/
│   │   │   ├── __pycache__/
│   │   │   │   └── *.pyc
│   │   │   │
│   │   │   └── commands/
│   │   │       ├── backup_datasets.py
│   │   │       ├── create_definitive_groups.py
│   │   │       └── get_all_permissions.py
│   │   │
│   │   ├── migrations/ # Literally migrations...
│   │   │   ├── __pycache__/
│   │   │   │   └── *.pyc
│   │   │   │
│   │   │   └── __init__.py
│   │   │   └── ***(migrations_auto_...).py
│   │   │
│   │   ├── scripts/
│   │   │   ├── __pycache__/
│   │   │   │   └── *.pyc
│   │   │   │
│   │   │   └── SC_DSH.py # A script used by SC_ScriptInst.py. It was instantiated (spawns another window) to acknowledge IoT device communicating with the server. Requires Django-Extension to use this script.
│   │   │
│   │   ├── __init__.py
│   │   ├── admin.py
│   │   ├── apps.py
│   │   ├── forms.py
│   │   ├── models.py
│   │   ├── urls.py
│   │   └── views.py
│   │
│   ├── SmartClassroom/ # Django Base Project Folder. Auto-generated by Django-admin.
│   │   ├── __pycache__/
│   │   │   └── *.pyc
│   │   │
│   │   ├── __init__.py
│   │   ├── asgi.py
│   │   ├── settings.py
│   │   └── urls.py
│   │
│   ├── static_src/ # Known as static source files. Those are used for rendering of styles and used for extra functionalities of the web-app itself.
│   │   └── css/
│   │   │   └── *.css / *.css.map
│   │   │
│   │   └── js/
│   │   │   └── *.js / *.min.js / *.js.map
│   │   │
│   │   └── rsrc/
│   │       └── *.jpg / *.png
│   │
│   ├── template_CALLABLE/ # Known as Preset Components. Those are callables and referrable to Class-Basediews.
│   │   ├── elem_inst_view.html
│   │   └── *noContextReponseOnly.html
│   │
│   ├── template_REQUIRE/ # Known as Modular Components. Those are Required Templates To Use by the template_CALLABLE HTML Candidates.
│   │   ├── footer.html
│   │   ├── header.html
│   │   ├── modals.html
│   │   ├── nav.html
│   │   └── sidebar.html
│   │
│   ├── template_REUSE/ # Known as Reusable Components. Those templates have it's own content and cannot be paired with another reusable component.
│   │   ├── 404.html
│   │   ├── classroom_control.html
│   │   ├── dashboard.html
│   │   ├── instance_listviewer.html
│   │   └── login.html
│   │
│   ├── usersrc/ # Contents that are user-generated. They will be used in rendering if provided by the user.
│   │   └── <Confidential...>
│   │
│   └── manage.py
│
├── .gitignore
├── LICENSE
├── README.md
├── requirements.txt
└── SC_ScriptInst.py
In this section, we’re going to talk in the software-side and hardware-side. This should be enough if you’re willing to duplicate this project both physically and virtually working. Keep in mind that this will be a bit hectic. So take time if you’re willing to do something about this project.
In this section, we will be slightly talking about the required microcontroller,and the required components… Just so you know, this project is so expensive asf in the hardware stuff so that should be a spoiler alert for you. It took our allowance by 75% by the time we’re buying the components. Anyway, let’s get started.
The most common typical microcontroller that the project uses is the NodeMCU v2 Lua ESP8266EX Version. We generally recommend using ESP32 which is just a slight realization after finishing this project. I myself, might guess this the PINS used in NodeMCU v2 Lua ESP8266EX Version is the same as ESP32. Though, I can’t investigate further since I don’t have ESP32 at the moment.
“Why should I use ESP32 instead of ESP8266 / ESP8266EX?”
The reason why is because of the Pin’s Availability. I believe ESP32 pins are more accessible and less restrict when booting up than ESP8266. Sure, you could put a data pins on some parts of NodeMCU v2 ESP8266. But at some point in time, that would lead to boot failure. Please refer to some guides such as this one. This site will really help you out on why investing to ESP32 is better than NodeMCU v2 Lua. Though if you think going for NodeMCU v3. The issue is literally quite the same. So be wise on what MCU to choose.
As long as the MCU has the capability to handle GT5X Instructions (For Fingerprint specifically…) and able to handle tasks by responding to requests both in POST and GET forms. And has the ability to handle the extensive stacked task as we have a Millis Management for Room Locks. Then you’re good to go. Keep in mind the RAM is one of the factors to consider. As far as I developed it, I might be able to consume a lot of RAM for the tests.
The components that we used, were essentially in my inventory already. So the cost of the project gets higher than I thought. That’s because as a hobbyist, I find one of those are bare-minimum to withstand this project and able to make something out of it. So here’s the list along with their intentions.
GT-521F32 Fingerprint Sensor
LCD 20×4 with (I^2)C Backpack
Two-Sided DIP Switch x2
PIR Motion Sensor HC-SR501
DC-DC Buck Converter 3A MP1584EN
DHT 11/22 Humidity and Temperature Module
Dupont-Type Jumper Wires (10 to 30 cm)
12 V Powered Solenoid Lock (Magnetic)
3-Channel Relay Module (with Octocoupler)
12V Adapter to Jack Output (Recommended: 12V, Minimum: 9V)
(Optional) Bulb [1]
(Optional) Extension Cord [2]
(Optional) Raspberry Pi 4B [3]
(Optional) Router or Repeater [4]
(Optional) Power Jack [5]
What’s with the Adapter?
The reason why I gave parameters is because the project requires a voltage with sufficient reliability and better current. If you intent to make the project work by directly connecting the PWR to NodeMCU and let all components connected to it to VCC. You will feel that your NodeMCU’s diode will collapse. This is where the buck converter comes in. You have to feed 9-12V to buck converter. Set output to 5.4 to 5.7V respectively. And put the output in rail to be used by components + to be used by MCU via VIN pin.
Also, I included the minimum as a possible best minimum setup. As per the requirements says, we have a 12V powered solenoid lock. That is where 12 V has to do something on it. If for in case, you have a solenoid lock or any kind of locks rated to 9V respectively. Then it is best to go for 9V Adapter. Just do the same setup as usual by setting buck converter output to given said respectively voltage and you’re ready to go.
Some components were indicated as optional. Why?
We have several reasons. For [1] and [2], we have to indicate it as optional since we didn’t provide schematics for our project. This was intended for the test of relay functionalities. For [3] and [4], this was our usual setup. But due to Pandemic, we’re unable to set it up. So instead of using it, we just use our home router and laptop to host the server. Though in this project, we already set compatibility for Raspberry Pi 4B Project Launch. Kinda a waste of time but support for it was a success. And lastly but not the least, the [5] power jack. This is indeed unusual, but if you’re planning to use this, even as a module, it would be great! The setup of this project has a required parameter especially in the Voltage. The voltage of the project should be set to 5.4V to 5.7V. Going further down or going further up will result in unexpected behaviors!
I don’t provide links to these components. That’s because the supplier is not supporting different countries. So let’s say we bought our parts in a local shop. Which technically true. We will only provide links that supports delivery to other countries.
In this section, I’ll be talking from scratch. Since this will be long enough, it’s best to check the Demo and Resources Section and watch Youtube Video Installation. To get the knowledge on how to install the components of the project.
DISCLAIMER: The setup and deployment may slightly be different from what is being demonstrated in the youtube video! But the output will be the same.
In order to move further to the deployment section, I don’t want to assume if you have anything installed. So it’s best to install the packages / modules inside of the requirements.txt
To install, you have to change the directory to the repository root level.
Type pip install -r requirements.txt and press enter.
With that, you should have the following packages / modules installed in your pip:

* Django (Version 3.0.5 and Above)
* Django_extensions (Version 2.2.9 and Above)
* Python-coveralls (Version 2.9.3 and Above)
* Coveralls (Version 2.0.0 and Above)
* Django-coverage-plugin (Version 1.8.0 and Above)
* Coverage (Version 5.1 and Above)

Since you have installed all of them its time to assume that you have a MariaDB Server that is online.
You have to create a database named sc_db. And leave it blank.
There will be a next step on how to put content in the `sc_db` database, so don't worry.
Next, we have to put models and migrations content in the sc_db database. With that, type python manage.py makemigrations.
Once done, type python manage.py migrate to apply all migrations that the Django did.
After that, setup up your superuser! Type python manage.py createsuperuser to fill the bare-minimum information needed.
Then, run python manage.py runserver and navigate to localhost:8000 to see if things are working.
Congratulations! You did it. But that doesn’t stop there. Because you have one thing left to do.
This is required since this will be your communicator in the server. To get started, follow the instructions below.
By File Manager / File Explorer, navigate to Externals\Sketch\NodeSketch_SC.
Open NodeSketch_SC.ino
At Line 38 Do EDIT the WiFi Target and it’s credentials. The following has its own labels or required positional arguments / parameters, check SmartClassroom.cpp or SmartClassroom.h.
Ensure that you’re connecting to where the server or the Django Server lives!
Connect all components to their corresponding PIN definitions declared at SmartClassroom.h.
Assuming you have NodeMCU device candidate in the board selection. (You can check by Tools > Board: XXXXXX). If NodeMCU did not show up. Then you might want to install the ESP8266 package for Arduino IDE.
If for instance you, already have one. Then set the NodeMCU board as the target board. Set Upload Sketch From Ranges (115200 * 256000). The higher the better, the higher it is, the capacitor has to exist from EN to GND. (10uF Electrolytic Cap).
Press Upload.
And… Done! Wait further and let the screen of the device to show the information such as the temperature and humidity, classroom subject and lock states.
In this section, we’re going to talk about on how to deploy this project. The way you open the project is not intended or the usual way for this one. The project contains a script that could launch multiple instances of Command Prompts / Terminals.
Just to make things clear, there are at least three command prompts / terminal instances and those are:
Smart Classroom | Script Instantiator (Base System | The One You Should Open)
Django Server Instance (Literally Runs inside SCControlSystem)
Smart Classroom | Data Stream Handler (Inside SCControlSystem, at Scripts Directory named SC_DSH.py)
In this section, it shows a list of protocols to better understand how the system works.
Shutdown Timer Based on Motion Sensor Protocol
For every subject, we have a time limit. In our system, everytime it is unlocked for a particular time. Every 5 minutes, the motion sensor has to detect a person for every 30 seconds. Now 10 scans for 30 minutes is equivalent for 5 minutes. If the scanner is in 50% state, it will continue for another 5 minutes. If the scanner is in 50% state less, it will shutdown the classroom itself.
For every node, for it be controllable, it has receive a subject code on it. Those are automatically given by the Data Stream Handler on the system. So it may need privilege for explicit assignment of subjects. Anyway, any other such explicit actions without any subject assignment to the classroom. Will result to its functionality as defaulted to be locked, electricity turned off. So for maintenance for instance, there should be a custom made admin subject along with time.
If for instance, the subject is the last subject, any other circumstance may be stopped in the middle of a session. So the time has to be considered when using this system.
When the accessibilities handed out to the user. Some users might even tampered it without any hindrance to it. For instance if a user wants to access rooms not assigned to them. So for us to keep things safe, we have to disable links from other rooms but only displays their states to the rooms. Some rooms will only be enabled to you only if your subject linked to you is on the current time scope of the server time, it will be accessible and controllable within the outside range. Any user who attempts to access rooms, will technically make you get in but you’ll be recorded for the actions that is not quite acceptable. Meaning your name is in the list of logs who misused or accessed a particular room not currently assigned / focused to you.
I feel that some parts of this project is missing… Can you tell me what is it?
Sure bro… There are only a few things that are NOT CONSIDERED to give away. And those are the following:
PCB Design
Miniature Design Layout
Your code is not that very much clean / My eyes hurt! / Why would you code something much inlined and quite… stupid???
All codes that were done initially was not intended to be dirty as possible. They were like that due to the fact that we have deadlines to meet. That’s because I did most of the work here (In Software-Side) for 3 months straight. So I apologize for such a messy code. And yeah, the hardest part to accept when making this one is that I was still learning the necessity parts of Django to our projects.
Can I use this whenever I want?
Yeah, sure. But keep note that the repository has a GPL-3.0 license. You have to read it and understand why I have to choose this one.
Do I really have to meet the required components indicated here?
For compatibility, of course. Since I didn’t provide for the schematics, you could use different components or MCUs to your liking.
How did you come with this project?
Long story short, I wanted to achieve ideal time for what allocated time was for the discussions and for the waiting time to open the room. In our school, you need a staff / administrator to open the room door for you. And I as for what I know, I don’t like how we wasting our time for nothing. That’s because they are late as usual. One thing to mention is that we have one course-dedicated room from the technological building and the one who is assigned to that building is taking a while to open our room because he was always LATE, and that is always the scenario during Monday, Wednesday, and Friday. It makes me feel bad, the fact that building is highly focused on technology! So, to make at least a solution, we were able to think of this project, without actually us thinking on how hard it is gonna be. And with that, a few weeks later, this project was born.
Why did you open-sourced this!? And aren’t you afraid it as the Lead Developer?
I don’t want to put any of my works in the bookshelf from which other people doesn’t see it. I want things to be accessible because that makes me want to value the hard work and sleepless nights that I throw off especially on this project. And yes, I’m not afraid of getting stolen. I always assume we could do things legal and proper. And I’m already a victim of it and know how it feels to get stolen by someone else.
What would you do if someone got stonks from this project?
I might close this one down. But I believe this project is very hard to replicate physically. I just do hope I could get something on it, or even just credits were just fine. Keep in mind that the project is just a bare-minimum setup that could be possibly done in-home or from small-scale buildings with multiple rooms. I know this type of setup is possibly expensive, but we’re just showing here the concept of what IoT can do nowadays.
Can I submit issues and submit a proposal for alternative methods?
That’s nice of you! Yes you can, just make things a bit formal. Even though I don’t have a template for making it descent and formal as possible. I would just give you freedom on how would you laid out the proposals or issues. Just label things out accordingly in the labels that I made.
This was such a medium-scale project!? How did you survive working on this one alone???
I don’t even know how I were able to survive this while learning throughout the semester. But hey, at least I wasn’t suicidal or didn’t got grave inside of depression. But to be honest, I did survive by just literally working on it non-stop. You really have to sacrifice having fun and being go-happy with others. You really have to focus on it. Which in the end, I was now quite emotionless, not being able to be happy at things that I want to be happy. – DISCLAIMER – I’m not scaring you or other people at trying to sacrifice for the better, this was literally just happened due to circumstances. Maybe there’s a better way to code productively and not by just coding all times and ending up at being emotionless and blame self for such stupid reasons…
I just checked the documentation and your recommendation is SO LONG! What the hell? So that means the project has a lot of flaws???
I would literally agree that it has quite a few flaws. NOT a lot. Because the majority of the functionalities of the system pretty works well in my own perspective. I could be wrong, because the fact that, we realized that during the pandemic online sessions. And we only fixed a few things. But that fixes and adjustments didn’t get committed in the repository. Which is quite disappointing. Anyway, IIRC the only problems or recommendations that I had is all about the implementation and how should I be using other components instead of having of what I currently have in the inventory.
Can I ask question/s?
Sure thing! Just be polite and I’ll answer your question through my email indicated in my Github Profile!
In this section, the maintainer will credits to various types of entities.
🙇 Personal Credits
As a maintainer, I would like to give gratitude to several people who take part on this project. Those people helped / contributed that is considered gold for us.
Charles Ian Mascarenas – Schematic Inspector and for Insights Given Regarding Buck Converter and Voltage Regulator Due To Current Exactly Caught by NodeMCU’s Diode for Relays and Other Such Components – ci-mascarenas
Engr. Cris Paulo Hate – Embedded System Instructor, Insights Given for Proper Components to Use for Locking Rooms such as Solenoid Lock and Insights were given for the future steps of the project. Such as the proper use of IoT components like ESP8266.* – Account Not Recognized.
Engr. Jan Justin Razon – Internet-of-Things Instructor, Insights Given for what things should be considered and how should the system work. Also insights given on what locking mechanism should be used for the room. – Account Not Recognized.
GT5X for Proper GT-521F52 Support instead of official support. (This one saves my entire dignity throughout the use of the GT-521F52 Fingerprint Sensor. Kudos to this guy!)
Isotope and Packery for Dynamic Layout Positioning based on User-Browser Space.
Material 2 for Continuously Supporting Daemonite’s Material 1 Work Throughout the Whole Year.
R. Yesodharan, R. Prince, S. Karthick, V. HariKrishnan and D. Bennaiah, “IoT based Classroom Automation using Arduino,” International Open Access Journal, vol. II, no. 2, pp. 306-307, 2018.
T. Sali, C. Pardeshi, V. Malshette, A. Jadhav and V. Thombare, “Classroom Automation System,” International Journal of Innovations in Engineering and Technology(IJIET), vol. VIII, no. 3, p. 27, 2017.
phenOncoX – crossmapped phenotype ontologies for cancer
Overview
An ontological definition of disease enables each type of disease to be
singularly classified in a formalized structure. By intention, the use of
disease ontology terms should facilitate a cross-link of information between
separate disease-related knowledge resources for a given domain.
In order to integrate such knowledge resources, there is henceforth a need
to cross-link or map the entries across disease ontologies to the extent it
is possible.
phenOncoX is an R data package that attempts to address this challenge.
In short, phenOncoX provides a global cross-mapped set of phenotype
ontology terms attributed to cancer phenotypes.
The mapping established within phenOncoX is semi-manually curated,
using OncoTree as the starting point
for a list of UMLS phenotype terms per cancer
subtype/primary site. Next, phenOncoX appends a number of phenotypes
attributed to heritable cancer conditions. Furthermore, each cancer subtype
entry in OncoTree is expanded with additional subtypes that are found in
the UMLS child-parent hierarchy of disease terms.
For each entry in the final list of phenotype terms, we make cross-mappings
with phenotype terms from EFO,
DO, and
the ICD10 classification.
As of early August 2025, the following ontology versions are used to create the mapping:
OncoTree (2025_04_08)
Experimental Factor Ontology v3.80.0 (2025-07-15)
Disease Ontology (v2025-08-01)
IMPORTANT NOTE: The mapping established by phenOncoX attempts
to be comprehensive, but we acknowledge that the presence of missing or
erroneous cross-references might still occur.
You can download and install the screensaver file ~/Windows/Blossom.scr or download the whole project and compile it yourself. If you are interested in the main algorithm, the source is in ~/Windows/Blossom/Blossom.cs.
Settings
You can customize the screensaver via the Settings button in Windows menu. There are 4 parameters:
Framerate. It’s the number of times the cellular automata updates per second. Warning: a high framerate value can be CPU intensive, specially for large screens.
Cell size. It’s the size of each cell, in pixels. Default is 1 cell = 1 pixel, but you can increase the size if you want pixelated or smaller patterns.
Uniformity. The higher this value is, the more uniformly the pattern will expand in every direction.
Growth. This represents the probability for a new cell to spawn. The higher the value, the faster the pattern will expand.
The last two parameters have great influence in the style of the patterns obtained. Try messing with them!
Examples
Pattern generated with uniformity = 0 and growth = 0.50:
Pattern generated with uniformity = 0.4 and growth = 0.05:
Pull requests are welcome. For major changes, please open an issue first to discuss what you would like to change. Please make sure to update tests as appropriate.
How To Contribute
Fork the repository to your own Github account.
Clone the project to your machine.
Create a branch locally with a succinct but descriptive name.
Commit changes to the branch.
Following any formatting and testing guidelines specific to this repo.
There are multiple checks executed through the usage of Github Actions to verify
the health of the code when pushed:
Compiler warning/errors: checked using cargo check and
cargo check ---tests. Use cargo fix and cargo fix --tests to fix the
issues that appear.
Unit tests: check that all unit tests pass using cargo test.
Code style: check that the code style follows standard Rust format, using
cargo fmt -- --check. Fix it using cargo fmt.
Code linting: Lint that checks for common Rust mistakes using
cargo clippy. You can try to fix automatically most of those mistakes using
cargo clippy --fix -Z unstable-options.
Code coverage: Detects code coverage with cargo-tarpaulin and pushes
the information (in master branch) to codecov.
License compliance: Check using REUSE for license compliance within
the project, verifying that every file is REUSE-compliant and thus has a
copyright notice header. Try fixing it with reuse lint.
Dependencies scan: Audit dependencies for security vulnerabilities in the
RustSec Advisory Database, unmaintained dependencies, incompatible licenses
and banned packages using cargo-deny. Use cargo deny fix or
cargo deny --allow-incompatible to try to solve the detected issues. We also
have configured dependabot to notify and create PRs on version updates.
Benchmark performance: Check benchmark performance and alert on
regressions using cargo bench and github-action-benchmark.
Browser testing: Check the library works on different browsers and operating
systems using browserstack. Run npm run local
on the browserstack folder to try it locally. You’ll need to configure the env variables
GIT_COMMIT_SHA, BROWSERSTACK_USERNAME, BROWSERSTACK_ACCESS_KEY.
Development environment
Strand uses Github dev containers to facilitate development. To start developing strand,
clone the github repo locally, and open the folder in Visual Studio Code in a container. This
will configure the same environment that strand developers use, including installing required
packages and VS Code plugins.
We’ve tested this dev container for Linux x86_64 and Mac Os arch64 architectures. Unfortunately
at the moment it doesn’t work with Github Codespaces as nix doesn’t work on Github Codespaces yet.
Also the current dev container configuration for strand doesn’t allow commiting to the git repo
from the dev container, you should use git on a local terminal.
Nix reproducible builds
strand uses the Nix Package Manager as its package
builder. To build strand, first install Nix correctly
in your system. If you’re running the project on a dev container,
you shouldn’t need to install it.
After you have installed Nix, enter the development environment with:
nix develop
Updating Cargo.toml
Use the following cargo-edit command to upgrade dependencies to latest
available version. This can be done within the nix develop environment:
cargo upgrade -Z preserve-precision
This repository doesn´t include a Cargo.lock file as it is intended to work as a library. However for Wasm tests we keep a copy of the file on Cargo.lock.copy. If you update Cargo.toml, keep the lock copy file in sync by generating the lock file with cargo generate-lockfile, then mv Cargo.lock Cargo.lock.copy and commit the changes.
building
This project uses nix to create reproducible builds. In order to build the project as a library for the host system, run:
nix build
You can build the project as a WASM library with:
nix build .#strand-wasm
If you don’t want to use nix, you can build the project with:
cargo build
Build with parallelism
Uses rayon’s parallel collections for compute intensive operations


 https://github.com/santospatrick/react-ts-cdk