Blog

  • PrediHome

    PrediHome: Housing Price Index and Employment Rate Analytics

    PrediHome is an interactive web app built using R and Shiny, designed to help users make informed decisions about the best province to live in Canada. The app provides detailed analytics on housing price data (HPI), unemployment rate, and employment rate data for the years 1986-2035. Users can input a specific year and receive insights and predictions about the HPI and employment metrics across different provinces.

    Objective

    The primary goal of PrediHome is to help users evaluate potential provinces to live in based on key economic and housing indicators. Users can:

    • Explore historical data (1986-2022) and predicted data (2023-2035).
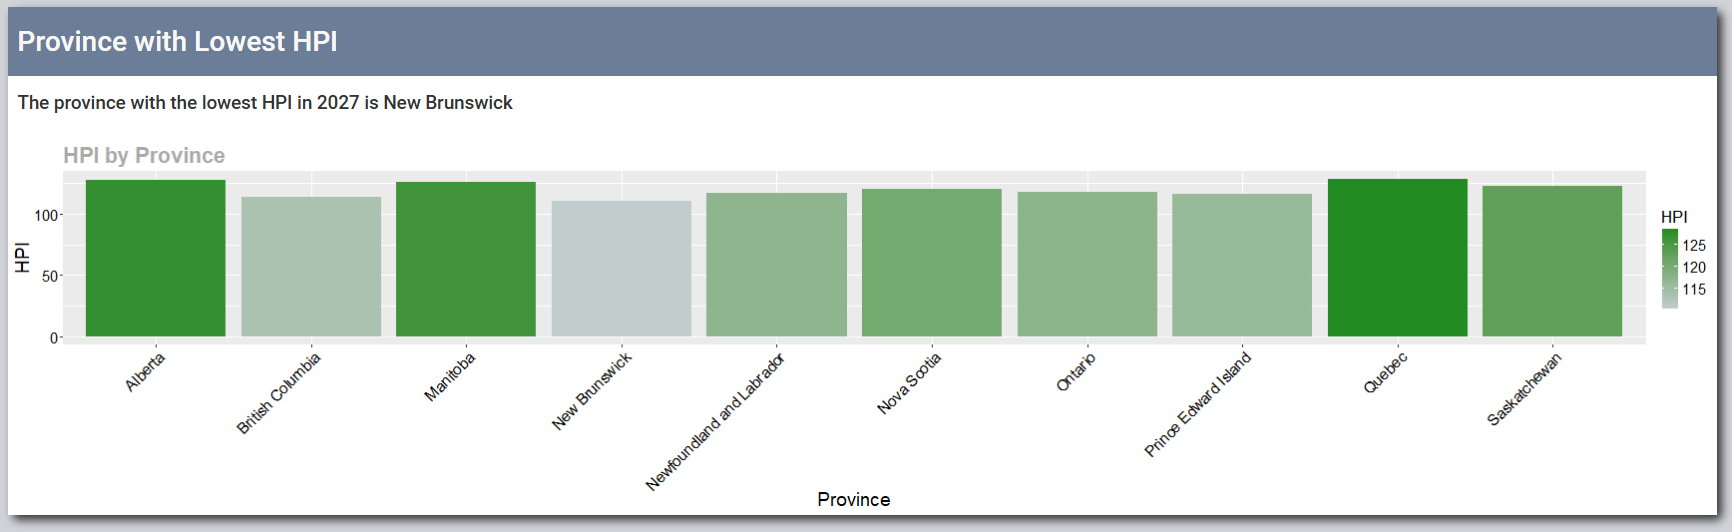
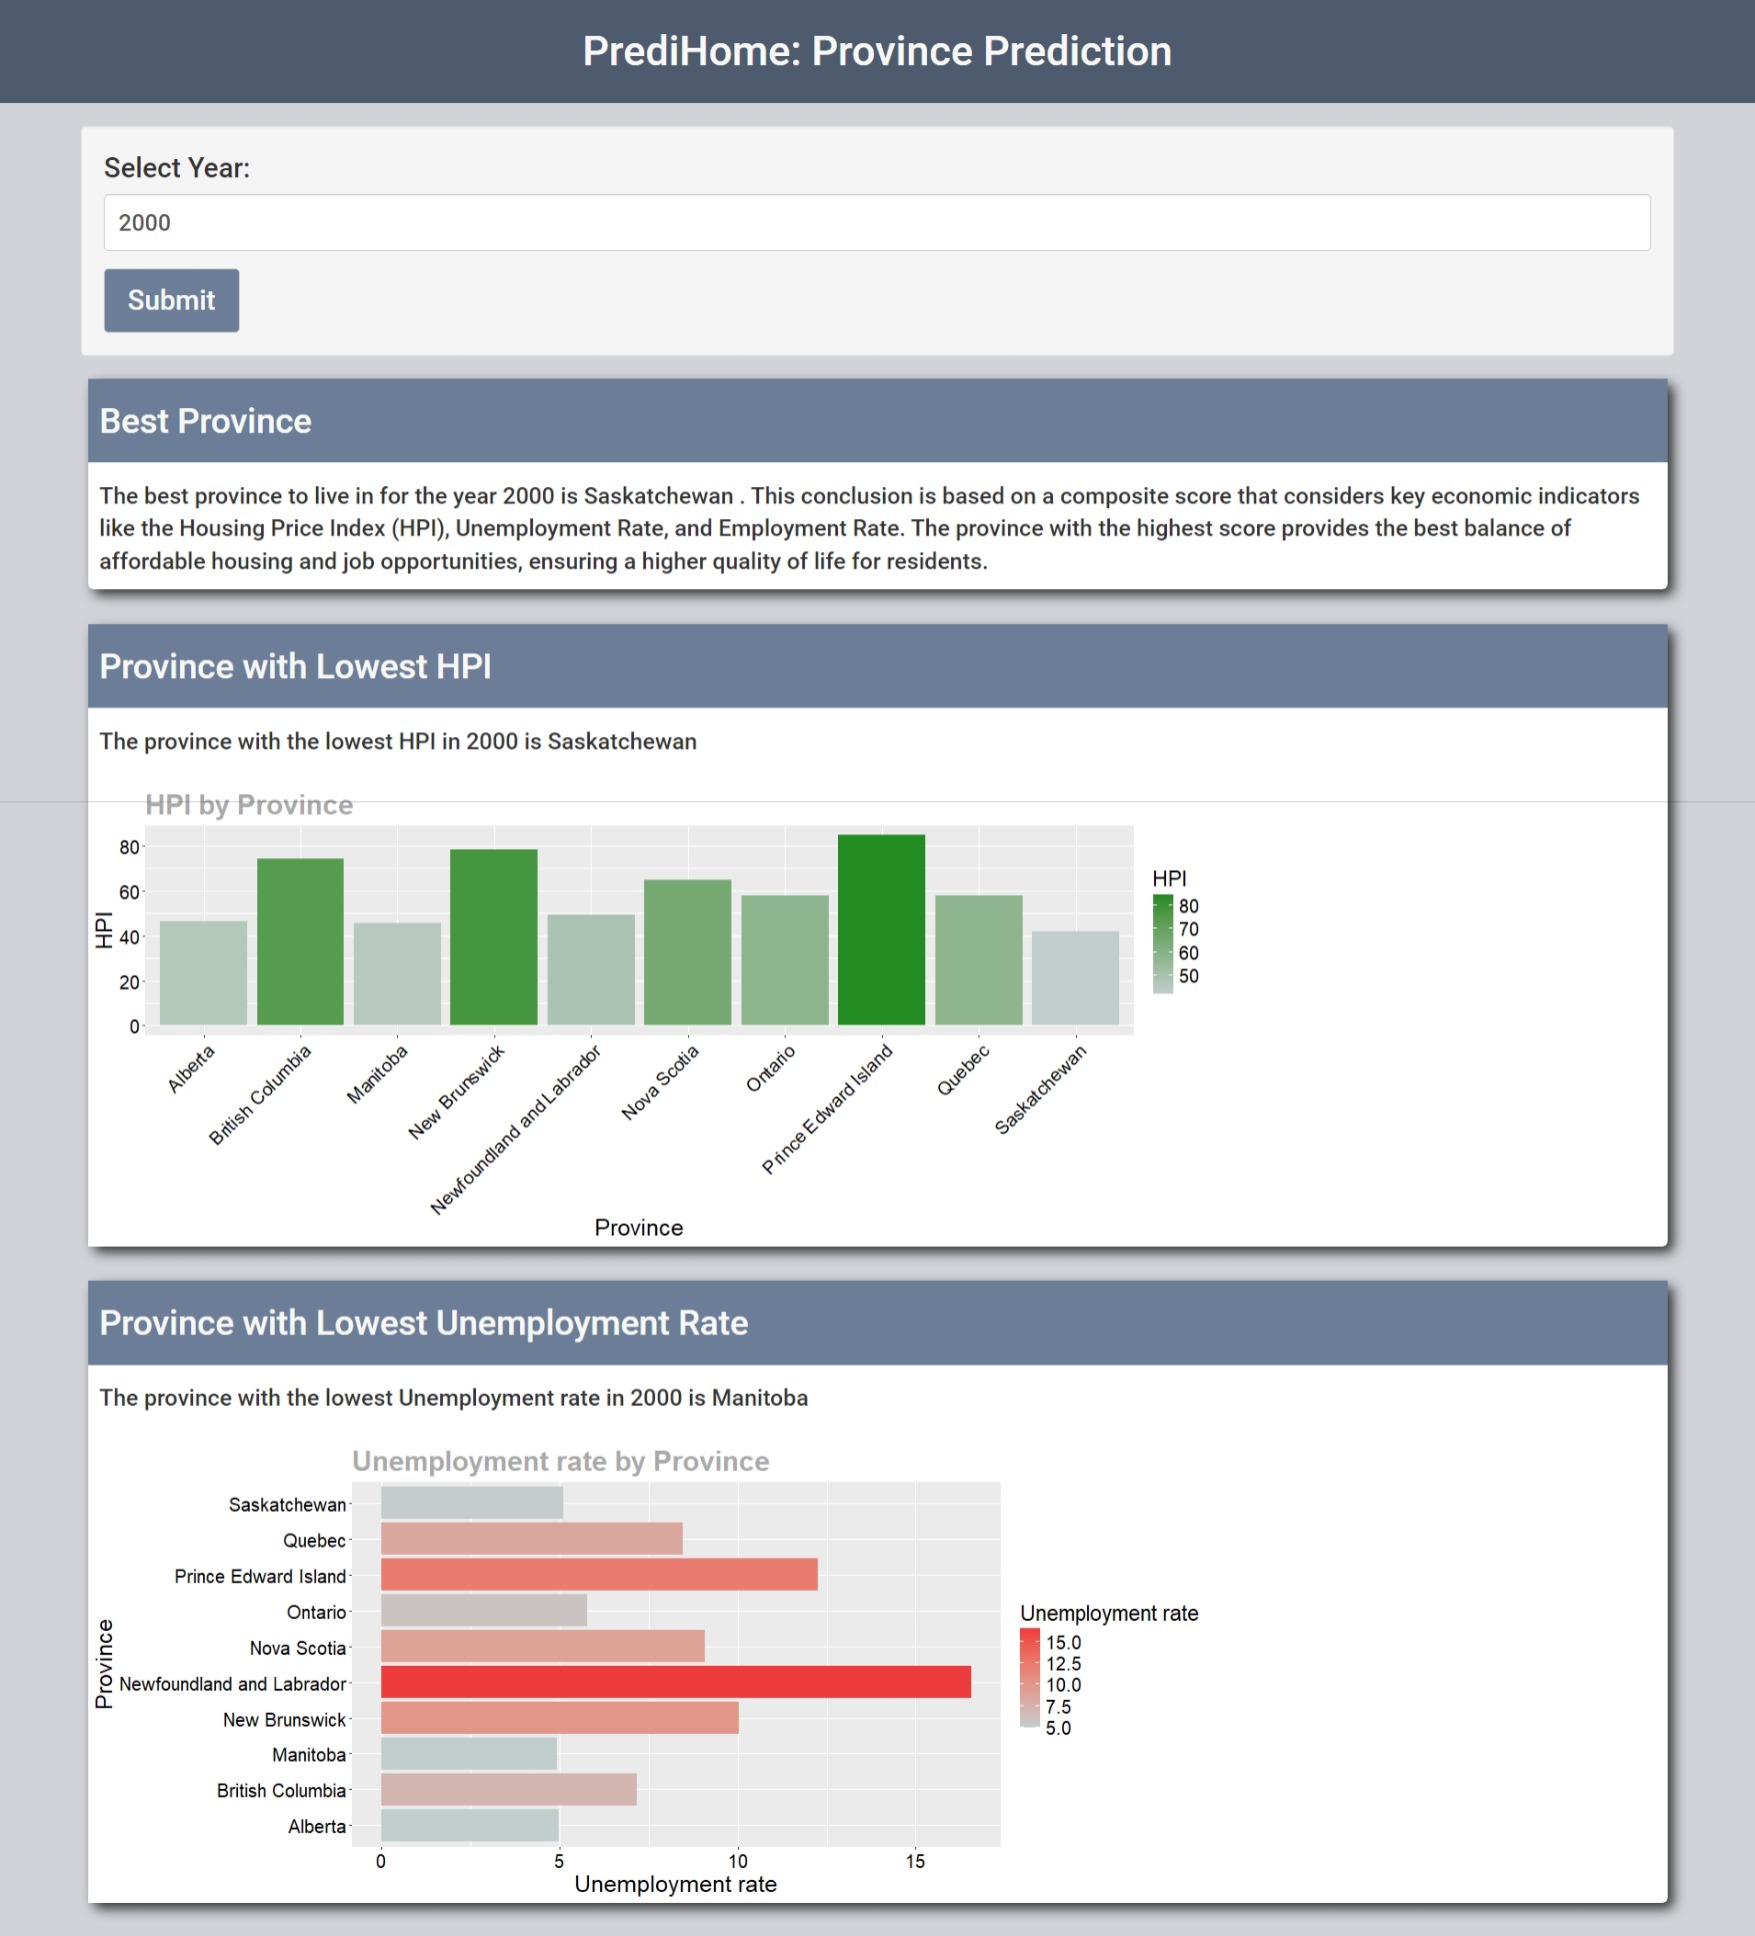
    • View the province with the lowest Housing Price Index (HPI) and the province with the lowest unemployment rate.
    • Visualize HPI and employment statistics for different provinces, assisting in comparing various factors that impact the cost of living.

    Features

    1. User Input:

      • Users select a year between 1986 and 2035 to analyze housing prices and employment statistics.
    2. Data Analysis:

      • The app identifies the lowest HPI province and lowest unemployment rate province using both historical data and predictive models (for the years 2023-2035).
    3. Visualizations:

      • Bar Chart: Displays the HPI values for each province in the selected year.
      • Bar Chart: Shows the unemployment rate for each province in the selected year.
    4. Regression Model Predictions (for years 2023-2035):

      • Uses linear regression models to predict future HPI and unemployment rates based on historical data.
    5. Identifies the best province to live in:

    • Calculates a composite score for each province, where a higher score indicates a better province to live in. This is done based on the following metrics:
      • Housing Price Index (HPI)
      • Unemployment Rate
      • Employment Rate

    Datasets

    The analysis is based on the following datasets from Kaggle:

    1. Canada housing price data by regions 1981-2022: Contains data on the housing price index for each province in Canada between 1981 and 2022.
    2. Unemployment in Canada, by Province (1976-Present): Includes employment and unemployment rates for each province between 1976 and 2022.

    Steps Involved

    1. Data Preprocessing:

    • Cleaned and prepared the datasets by removing unnecessary columns and aggregating data at the province level for comparison.

    2. Data Analysis:

    • Historical Data (1986-2022): Analyzed trends in HPI and unemployment rates across provinces.
    • Prediction for Future Years (2023-2035): Applied regression models to predict future values of HPI and unemployment rates.

    3. Data Visualization:

    The following visualizations help users understand and compare housing and employment metrics across provinces:

    1. Bar Chart: Housing Price Index (HPI) by Province

    • A bar chart showing HPI values for each province in the selected year.
    • Helps users visually compare housing prices and identify affordable or expensive provinces for that year.
    • The bars have continuous color coding that reflects the HPI values.

    Bar Chart: Housing Price Index

    2. Bar Chart: Unemployment Rates by Province

    • A bar chart displaying the unemployment rate for each province in the selected year.
    • Helps users analyze the economic climate in different provinces and make informed decisions about employment opportunities.
    • The bars have continuous color coding that reflects the unemployment rates.

    Bar Chart: Unemployment Rates

    User Interface

    PrediHome features a modern, easy-to-navigate user interface that includes:

    • Numeric Input: Users can select a year between 1986 and 2035.
    • Submit Button: After selecting the year, users can click the submit button to receive:
      • The overall best province to live in.
      • The province with the lowest HPI.
      • The province with the lowest unemployment rate.
      • Visualizations: A bar chart showing the HPI values of all provinces and one showing unemployment rates for all provinces. User Interface

    Tech stack

    • R: For data cleaning, manipulation, and analysis.
    • Shiny: For building the interactive web application.
    • ggplot2: For creating visualizations like bar charts.
    • dplyr: For data manipulation and aggregation.
    • tidyr: For tidying and reshaping the data.
    • lm(): For building regression models to predict future data.

    How to Run the App in RStudio

    1. Install the necessary R packages:
      install.packages(c("shiny", "ggplot2", "dplyr", "tidyr"))
      
    2. Clone or download the repository.
    3. Open the R script and run the app.
    4. Enter a year (1986-2035) to view the analysis and predictions.
    • Note: If you see an error that says “cannot open file ”: No such file or directory“, run setwd("<path_to_working_directory>") in your terminal, replacing <path_to_working_directory> with the path to the directory containing the files you cloned.

    Authors

    Visit original content creator repository https://github.com/RafatH0ssain/PrediHome
  • jsonforenv

    jsonforenv

    jsonforenv

    jsonforenv is a simple tool that simplifies the configuration of environment variables. With it, you can easily load environment variables from a JSON configuration file, making your application configuration more organized and flexible.

    GitHub stars GitHub fork GitHub license

    Installation

    You can install it via npm or yarn:

    npm install jsonforenv
    # Or
    yarn add jsonforenv

    Usage

    First create a .json file, in the location you want.

    {
      "DATABASE_URL": "mongodb://localhost/mydb",
      "SECRET_KEY": "mysecretkey",
      "DEBUG_MODE": true
    }

    import the library into your code:

    import { loadEnvFromFile, loadEnvFromFolder } from "jsonforenv";

    If you want to load just one configuration file, call the loadEnvFromFile function passing the path to the JSON file containing the environment variables:

    loadEnvFromFile("path/to/your/config.json");

    Now if you want to load several configuration files that are inside a folder, call the loadEnvFromFolder function passing the path to the folder containing the .json files:

    loadEnvFromFolder("path/to/your/folder");

    If the JSON file found is valid, the environment variables will be loaded based on the settings provided in the file, as in the example below:

    import { loadEnvFromFile } from "jsonforenv";
    loadEnvFromFile();
    
    console.log(process.env.DATABASE_URL); // mongodb://localhost/mydb
    console.log(process.env.SECRET_KEY); // mysecretkey

    FAQ

    Does it throw errors?

    jsonforenv handles errors during the JSON file loading process. If errors occur when reading the file, parsing the JSON, or if the file is not found, the library will throw appropriate errors to inform the user of the problem.

    Here is an example of how to catch errors when using jsonforenv:

    try {
      loadEnvFromFile("path/to/your/config.json");
    } catch (error) {
      console.error(error.message);
      // Do something about the error if necessary
    }

    Contributing

    Contributions are welcome! Feel free to open issues and submit pull requests to improve this package.

    License

    This project is licensed under the MIT License.

    Assignments

    Visit original content creator repository https://github.com/HarukaYamamoto0/jsonforenv
  • ofxSlicer

    ofxSlicer

    Slices mesh geometry into layers consisting of curves. Written in c++ as an addon for Openframeworks. Currently missing any form of infill strategy and .gcode generation.

    current

    The Slicer

    The slicing algorithm goes something like this:

    1. Create a list containing all triangles of the mesh model.
    2. Mesh slicing: Calculate triangle intersection points on each plane.
    3. Construct contours: Create polygons from the intersection points for each plane.
    4. Make sence of the polygons (Clockwice/Counterclockwise)

    Full disclaimer. I´m new to C++, and by no means an expert in programming. I wanted to keep close track on how the memory is used and allocated by the slicer. Based on this I decided that C++ would be an optimal choise of language. I´m also having a really alright time with Openframeworks.

    Getting the triangles

    Getting the triangles was a bit of a struggle in Openframeworks. To import .stl files, I use the ofxAssimpModelLoader addon in openframeworks. It took some tweaking to get the triangle faces, with it´s belonging vertices extracted from the assimp class. All the triangles are sorted in ascending order in terms of the lowest point in the triangle. I have commented this in the code. NOTE: It would probaly be easier to use some kind of existing C++ framework for geometry like CGAL

    Calculate the triangle intersections

    Once we have the triangles it´s time to calculate the intersection points on each layer. Have a look at this figure.

    triangleInter

    I basically have three diferent situations.

    1. The triangle is located on the topside of the layer plane
    2. The triangle is intersecting with the plane.
    3. The triangle is underneath the plane. This means that the slicer is finished processing it.

    Active triangles

    To improve the speed of the algorithm the triangles that are finished processed are removed from the triangle list that is used in the calculation. This condition applies when the entire triangle is located underneath the layer plane. See figure.

    active triangles

    Generate Polygons

    TODO: Come back and explain this

    How you can use it

    Reusing the slicer in your Openframeworks project should be pretty straightforward.

    • clone the git into your local addons folder
    • use the Openframeworks projectGenerator to include the ofxSlicer in your project
    • create an ofxSlicer object, feed it an stl and start slicing. Do a debug if your want to study how the data is structured.

    Visit original content creator repository https://github.com/frikkfossdal/ofxSlicer
  • eks-container-pipeline-cdk-template

    Welcome to the EKS sample container pipeline

    This is a CDK TypeScript project that packages a Cluster Sample App into a container. Containers are a great fit for workloads because they’re lightweight, start quickly, and optimize the utilization of the underlying instance. The Sample App container is a quick start solution that can be used to bootstrap kubernetes projects.

    Note: you must have an EKS cluster deployed as pre-requisite. You can follow the instructions defined here to create a cluster.

    To get started with this project.

    1. Clone the repository to your local workstation

    2. Install CDK

    npm install aws-cdk-lib
    
    1. Bootstrap CDK
    cdk bootstrap
    
    1. Install the required packages:
    npm install
    
    1. Export environment variables that will be used in the next steps:

    export CLUSTER_NAME=mycluster
    export AWS_ACCOUNT_ID="$(aws sts get-caller-identity --query Account --output text)"
    export GIT_REPO=myDemo
    export AWS_REGION=us-east-1
    

    Note: You can change the region to reflect the location where you want to deploy the code sample.

    1. Execute the following command to allow CodeBuild to deploy the sample application on EKS:
    eksctl create iamidentitymapping --cluster ${CLUSTER_NAME} --region ${AWS_REGION} --arn arn:aws:iam::${AWS_ACCOUNT_ID}:role/codeBuildDeployRole --group system:masters
    
    1. Deploy the code sample to create the end-to-end CI/CD pipeline:
    cdk deploy --parameters notificationEmail=xxx@yyy.com --parameters notifyPhone=+9999999999 --parameters gitRepoName=${GIT_REPO} --parameters clusterName=${CLUSTER_NAME}
    

    The code sample deploys the following resources:

    • CodeCommit repository to store the Sample App
    • ECR registry to store the Sample App image
    • CodeBuild project to build Sample App images on ARM or x86
    • SNS Notifications to update end users on the status of the build
    • CodePipeline to perform the build stages and release to production
    • Unit tests definition and a report group to display unit tests results in CodeBuild
    • CodeBuild project to deploy a container to EKS

    Visit original content creator repository
    https://github.com/aws-samples/eks-container-pipeline-cdk-template

  • Social-links-profile-css-html

    Frontend Mentor – Social links profile

    Design preview for the Social links profile coding challenge

    Welcome! 👋

    Thanks for checking out this front-end coding challenge.

    Frontend Mentor challenges help you improve your coding skills by building realistic projects.

    To do this challenge, you need a basic understanding of HTML and CSS.

    The challenge

    Your challenge is to build out this social links profile and get it looking as close to the design as possible.

    You can use any tools you like to help you complete the challenge. So if you’ve got something you’d like to practice, feel free to give it a go.

    Your users should be able to:

    • See hover and focus states for all interactive elements on the page

    Want some support on the challenge? Join our community and ask questions in the #help channel.

    Where to find everything

    Your task is to build out the project to the designs inside the /design folder. You will find both a mobile and a desktop version of the design.

    The designs are in JPG static format. Using JPGs will mean that you’ll need to use your best judgment for styles such as font-size, padding and margin.

    If you would like the design files (we provide Sketch & Figma versions) to inspect the design in more detail, you can subscribe as a PRO member.

    All the required assets for this project are in the /assets folder. The images are already exported for the correct screen size and optimized.

    We also include variable and static font files for the required fonts for this project. You can choose to either link to Google Fonts or use the local font files to host the fonts yourself. Note that we’ve removed the static font files for the font weights that aren’t needed for this project.

    There is also a style-guide.md file containing the information you’ll need, such as color palette and fonts.

    Building your project

    Feel free to use any workflow that you feel comfortable with. Below is a suggested process, but do not feel like you need to follow these steps:

    1. Initialize your project as a public repository on GitHub. Creating a repo will make it easier to share your code with the community if you need help. If you’re not sure how to do this, have a read-through of this Try Git resource.
    2. Configure your repository to publish your code to a web address. This will also be useful if you need some help during a challenge as you can share the URL for your project with your repo URL. There are a number of ways to do this, and we provide some recommendations below.
    3. Look through the designs to start planning out how you’ll tackle the project. This step is crucial to help you think ahead for CSS classes to create reusable styles.
    4. Before adding any styles, structure your content with HTML. Writing your HTML first can help focus your attention on creating well-structured content.
    5. Write out the base styles for your project, including general content styles, such as font-family and font-size.
    6. Start adding styles to the top of the page and work down. Only move on to the next section once you’re happy you’ve completed the area you’re working on.

    Deploying your project

    As mentioned above, there are many ways to host your project for free. Our recommend hosts are:

    You can host your site using one of these solutions or any of our other trusted providers. Read more about our recommended and trusted hosts.

    Create a custom README.md

    We strongly recommend overwriting this README.md with a custom one. We’ve provided a template inside the README-template.md file in this starter code.

    The template provides a guide for what to add. A custom README will help you explain your project and reflect on your learnings. Please feel free to edit our template as much as you like.

    Once you’ve added your information to the template, delete this file and rename the README-template.md file to README.md. That will make it show up as your repository’s README file.

    Submitting your solution

    Submit your solution on the platform for the rest of the community to see. Follow our “Complete guide to submitting solutions” for tips on how to do this.

    Remember, if you’re looking for feedback on your solution, be sure to ask questions when submitting it. The more specific and detailed you are with your questions, the higher the chance you’ll get valuable feedback from the community.

    Sharing your solution

    There are multiple places you can share your solution:

    1. Share your solution page in the #finished-projects channel of our community.
    2. Tweet @frontendmentor and mention @frontendmentor, including the repo and live URLs in the tweet. We’d love to take a look at what you’ve built and help share it around.
    3. Share your solution on other social channels like LinkedIn.
    4. Blog about your experience building your project. Writing about your workflow, technical choices, and talking through your code is a brilliant way to reinforce what you’ve learned. Great platforms to write on are dev.to, Hashnode, and CodeNewbie.

    We provide templates to help you share your solution once you’ve submitted it on the platform. Please do edit them and include specific questions when you’re looking for feedback.

    The more specific you are with your questions the more likely it is that another member of the community will give you feedback.

    Got feedback for us?

    We love receiving feedback! We’re always looking to improve our challenges and our platform. So if you have anything you’d like to mention, please email hi[at]frontendmentor[dot]io.

    This challenge is completely free. Please share it with anyone who will find it useful for practice.

    Have fun building! 🚀

    Visit original content creator repository https://github.com/Zenosaki/Social-links-profile-css-html
  • US-FlightDelayAnalysis

    US-FlightDelayAnalysis

    Analysis of delays of domestic flights from Us Airportsin 2008

    Summary

    We analyzed a data set of delayed flights from 2008 in the U.S. to determine the factors which contribute to delays. Among the factors inverstigated were individual airlines, total number of flights, time of day, month of year and airport. We were unable to perform further analysis on the reasons for delay because there were many missing values for the flight delay reason columns.

    Insights

    1. Count of All Flights vs. Delayed Flights: It is apparent from the graph of all flights vs delayed flights that there is a correlation between the two, as was expected. Surprisingly, the volatility in the delayed curve not present in the all-flights curve indicates that delayed flights is not a perfect function of the total number of flights. For example, the variance (or increases and decreases) in the delayed curve between weeks 10 and 20, 50 and 52 and to a lesser extent 36 and 40, is not reciprocated in the all-flights curve.

    2. Average Airline Delay Time: The major airline carriers, US Airways, United Airlines, and Southwest Airlines appear to have limited carrier-caused delay times on average. Conversely, all the carrier who shoulder the blame for the longest extended wait times are smaller airlines like Hawaii, Comair, and Atlantic Southeast. Lastly, Mesa Airlines is clearly the worst airline for those fliers who lack patience or loose schedules.

    1. Airline Percent Flights Delayed: Unlike the average carrier delay times, the major airlines have the highest percentag of flights delayed. Interestingly, contrary to their laid-back image, the airlines representing Hawaii boast the most punctual departures of any carrier.

    2. Percentage of Flights Delayed by Hour and Day: The heat map – Days Of Week + Time of Day, indicates that afternoons and evenings are relatively more delayed compared to mornings. Friday and Sunday evenings are at the peak of delays.

    1. Percentage of Flights Delayed by Month: Flight delays are maximum in around the holiday season. During Christmas and Thanksgiving, the delays could go up to 57%. We have some outliers in the middle of February and end of March, where there are no holidays or any reason that stands out.

    1. Delays by Airport: The bubble map showed that the airports with most amount of delays are ATL in Atlanta and ORD in Chicago. ATL had 131,613 delays which constitutes 31.75% of all flights from ATL. ORD had 125,979 delays which constitutes 35.95% of all flights from ORD. Some airports with a lower amount of delays had a higher percentage of delayed flights. For example, AKN in King Salmon had 72 delays which constitutes 62.07% of all flights from AKN.

    Data sets

    Delayed US flights in 2008: https://www.kaggle.com/giovamata/airlinedelaycauses All US flights in 2008: https://www.kaggle.com/vikalpdongre/us-flights-data-2008#2008.csv Airport longitude and latitude location: https://raw.githubusercontent.com/jpatokal/openflights/master/data/airports.dat

    Tools And Libraries Used

    1. Jupyter Notebook
    2. Seaborn, Plotly, pyplot
    Visit original content creator repository https://github.com/SaritaIngu/US-FlightDelayAnalysis
  • face-pass

    FacePass – Your face-protected password vault

    APK Download Link

    About The Project:

    Today everyone has many credentials, bank cards, and important notes that they can’t remember the details of. They can’t write the credentials anywhere as it is a threat to the security of the credentials. With FacePass, users can keep their credentials safe as it requires face recognition and authentication. It also asks for the password during the login after face authentication, making it highly secure.

    Salient Features:

    • User authentication using Face ID via Tensorflow Lite.
    • Adding bank cards and websites login credentials.
    • Storing important notes.
    • The data is stored on the cloud to access from any device.

    Stack:

    • Flutter:

      Flutter is an open source framework to create high quality, high performance mobile applications across mobile operating systems – Android and iOS.

    • Tensorflow lite:

      TensorFlow Lite is an open source deep learning framework for on-device inference.

    • Flutter + Tensrorflow lite = tflite_flutter package:

      TensorFlow Lite plugin provides a dart API for accessing TensorFlow Lite interpreter and performing inference. It binds to TensorFlow Lite C API using dart:ffi.

    Flutter packages/dependencies:

    • tflite_flutter
    • camera
    • google_ml_kit
    • image
    • get_it
    • sqflite
    • tflite
    • flutter_speed_dial
    • fluttertoast
    • firebase_core
    • firebase_auth
    • cloud_firestore
    • flutter_launcher_icons

    Getting Started:

    I have made this project open source so that others can access and contribute to the development of this application. To install and run the project on your local system, follow the setup:

    Setup:

    1- Clone the repository:

    git clone https://github.com/srockstech/face_pass.git

    2- Open the folder: cd face_pass

    3- Install dependencies: flutter pub get

    4- Run on device (Check if a device is connected or any virtual device running): flutter run

    Navigating Through The App:

    Login/ Signup:

    • First signup through face detection and enter name and password.
    • Login to the app through face recognition and authentication and enter the password.

    Landing Page

    Home Page:

    • The Home page has a drawer and an add button. An user can add their important notes, website and bank card details directly by clicking on the floating add button.
    • The drawer has the options of Bank Cards, Websites, Notes and Logout.

    Home Page

    Add Details

    Drawer

    Bank Cards:

    • The ‘Bank Cards’ option in the drawer is the place where an user can check all the saved cards.
    • It also has a floating add button through which an user can add details of other cards.

    Bank Cards

    Add Card Details

    Websites:

    • The ‘Websites’ option in the drawer is the place where an user can check all the credentials of different websites saved by them.
    • It also has a floating add button through which an user can add credentials of other websites.

    Websites

    Add Website Details

    Notes:

    • The ‘Notes’ option in the drawer is the place where a user can check all the saved notes.
    • It also has a floating add button through which a user can add new notes.

    Notes

    Add Notes

    Logout:

    • The ‘Logout’ option in the drawer logs out the user.

    Logout

    Visit original content creator repository https://github.com/srockstech/face-pass
  • RopeByteString

    RopeByteString implementation

    An efficient, immutable rope-based ByteString implementation in Kotlin that provides superior performance for large-scale byte sequence operations.

    Overview

    RopeByteString is an immutable sequence of bytes organized in a binary tree structure, where leaf nodes contain chunks of the byte sequence and branch nodes combine these chunks. This implementation significantly improves performance for operations like concatenation and substring extraction, especially for large byte sequences.

    Features

    The implementation supports several key operations with optimized performance characteristics:

    • Concatenation: $$O(1)$$ time complexity, avoiding data copying
    • Substring extraction: $$O(log n)$$ time and space complexity
    • Index-based byte access: $$O(log n)$$ with caching optimization
    • Conversion to/from ByteArray
    • String comparison operations (startsWith, endsWith, etc.)

    Performance highlights

    Concatenation

    When concatenating 1000 strings of 10000 bytes each:

    • ByteString: ~1.3 seconds
    • RopeByteString: ~16 microseconds
    • Memory allocation reduced from ~10GB to ~88KB per operation

    Substring operations

    For a 100KB string with 50% window:

    • ByteString: ~223ms
    • RopeByteString: ~9ms
    • Memory allocation reduced from ~2.5GB to ~69MB per operation

    You can find the full performance report in the following documents:

    Also in the Releases tab next to the latest release you can find all the logs from benchmark runs.

    Usage

    // Create from byte array
    val bytes = byteArrayOf(1, 2, 3, 4, 5)
    val ropeString = bytes.toRopeByteString()
    
    // Create with specific chunk size
    val customRopeString = RopeByteString(
        data = bytes,
        chunkSize = 4096,
        maintainBalance = true
    )
    
    // Concatenation
    val combined = ropeString1 + ropeString2
    
    // Substring
    val part = ropeString.substring(startIndex = 1, endIndex = 4)
    
    // Get byte at index
    val byte = ropeString[2]
    
    // Convert to byte array
    val byteArray = ropeString.toByteArray()

    Implementation details

    The implementation uses a binary tree structure with:

    • Leaf nodes storing actual byte data in chunks
    • Branch nodes maintaining metadata and combining chunks
    • Configurable chunk sizes (default: 1024 bytes, max: 8192 bytes)
    • Caching mechanism for optimized sequential access
    • Optional tree balancing for consistent performance

    Optimizations

    1. Chunk-based storage

      • Configurable chunk sizes for different use cases
      • Default 1024-byte chunks for general usage
      • Larger chunks (4096-8192 bytes) for better large string performance
    2. Caching system

      • Implements LastChunkRopeByteStringCache for recent access
      • Significantly improves sequential access performance
      • Reduces effective time complexity for sequential operations
    3. Tree balancing

      • Optional balance maintenance
      • Ensures consistent performance across operations
      • Automatically rebalances when needed

    Design decisions and technical considerations

    Cache implementation strategy

    The RopeByteString implementation includes a mutable state cache field that presents interesting trade-offs in terms of thread safety and performance. While this introduces the only mutable state in an otherwise immutable data structure, the decision to implement caching was driven by significant performance benefits, particularly for sequential access patterns.

    The current implementation prioritizes performance in non-concurrent scenarios, as this represents the most common use case. Alternative approaches were considered:

    1. Removing caching entirely would have significantly impacted performance, particularly for string comparison operations that rely on sequential index access.

    2. Implementing atomic cache updates through AtomicReference would have provided thread safety but at the cost of reduced performance in non-concurrent operations, which constitute the majority of use cases.

    The current design maintains flexibility for future improvements. Adding synchronization mechanisms around the cache would preserve backward compatibility, whereas starting with strict atomicity guarantees would have created an irreversible contract with users.

    Substring implementation considerations

    The substring implementation reflects careful consideration of memory usage patterns and performance implications. The current approach copies partial chunks when substring boundaries intersect chunk boundaries. While this involves some data copying, it offers several advantages over alternatives.

    An alternative approach of storing offsets and lengths in leaf nodes was considered but rejected due to potential memory inefficiencies. For example, with an 8KB chunk size, a substring operation removing a single byte would still maintain a reference to the entire 8KB chunk. This could lead to:

    1. Inefficient memory utilization
    2. Increased memory footprint as such substrings accumulate
    3. Potential memory leaks if references to large chunks are maintained for small substrings

    This design decision mirrors the evolution of Java’s String class, which similarly moved away from offset-based substrings to copy-based implementations. The current approach provides a better balance between memory efficiency and performance, particularly considering the constant chunk size relative to string length.

    The implementation maintains $$O(log n)$$ complexity for substring operations while ensuring efficient memory utilization through controlled chunk copying. This approach aligns with the broader goals of the RopeByteString implementation: providing efficient string operations while maintaining predictable memory usage patterns.

    Visit original content creator repository
    https://github.com/DmitryNekrasov/RopeByteString

  • KarmaAPI

    Karma API (Terrible name I know, will probably change)

    This API is written in 100% Swift and uses the Vapor web framework. It also uses Turnstile for authentication using only your phone number thanks to Digits.

    iOS App

    There is also and iOS app that goes along with this API that will be open sourced when its ready and will show up here

    What?

    These projects will create an easy way to track tasks and rewards for a group of users. Eg. A parent might setup a group for their family and add tasks (eg. chores) and rewards (eg. allowance or priviledges) and then can easily know what has been done and what needs to be done still. TODO: Fill in more here

    Why?

    This project has been many things since it was began as just an idea. It was a hobby project initially for learning what Swift would be like on the server. After which it became part of a project for my iOS class at Dixie State University. I then worked on it at a local hackathon event. Now it has become a project which I am passionate about because it brings all my favorite things together being Swift, APIs, iOS, OSS, and parenthood. Parenthood? Yes because being a parent is hard and raising kids is also hard and thats why I came up with the idea for this project.

    TODO: Fill in more here

    How

    Point Tracking

    Allows you to create Tasks and Rewards with an associated point values and mark them as completed and verified and also can give a history of the transactions.

    Visit original content creator repository
    https://github.com/kdawgwilk/KarmaAPI

  • huddle-landing-page-with-alternating-feature-blocks

    Frontend Mentor – Huddle landing page with alternating feature blocks solution

    This is a solution to the Huddle landing page with alternating feature blocks challenge on Frontend Mentor. Frontend Mentor challenges help you improve your coding skills by building realistic projects.

    Table of contents

    Note: Delete this note and update the table of contents based on what sections you keep.

    Overview

    The challenge

    Users should be able to:

    • View the optimal layout for the site depending on their device’s screen size
    • See hover states for all interactive elements on the page

    Screenshot

    Add a screenshot of your solution. The easiest way to do this is to use Firefox to view your project, right-click the page and select “Take a Screenshot”. You can choose either a full-height screenshot or a cropped one based on how long the page is. If it’s very long, it might be best to crop it.

    Alternatively, you can use a tool like FireShot to take the screenshot. FireShot has a free option, so you don’t need to purchase it.

    Then crop/optimize/edit your image however you like, add it to your project, and update the file path in the image above.

    Note: Delete this note and the paragraphs above when you add your screenshot. If you prefer not to add a screenshot, feel free to remove this entire section.

    Links

    My process

    Built with

    • Semantic HTML5 markup
    • CSS custom properties
    • Flexbox
    • CSS Grid
    • Mobile-first workflow
    • React – JS library
    • Next.js – React framework
    • Styled Components – For styles

    Note: These are just examples. Delete this note and replace the list above with your own choices

    What I learned

    Use this section to recap over some of your major learnings while working through this project. Writing these out and providing code samples of areas you want to highlight is a great way to reinforce your own knowledge.

    To see how you can add code snippets, see below:

    <h1>Some HTML code I'm proud of</h1>
    .proud-of-this-css {
      color: papayawhip;
    }
    const proudOfThisFunc = () => {
      console.log('🎉')
    }

    If you want more help with writing markdown, we’d recommend checking out The Markdown Guide to learn more.

    Note: Delete this note and the content within this section and replace with your own learnings.

    Continued development

    Use this section to outline areas that you want to continue focusing on in future projects. These could be concepts you’re still not completely comfortable with or techniques you found useful that you want to refine and perfect.

    Note: Delete this note and the content within this section and replace with your own plans for continued development.

    Useful resources

    • Example resource 1 – This helped me for XYZ reason. I really liked this pattern and will use it going forward.
    • Example resource 2 – This is an amazing article which helped me finally understand XYZ. I’d recommend it to anyone still learning this concept.

    Note: Delete this note and replace the list above with resources that helped you during the challenge. These could come in handy for anyone viewing your solution or for yourself when you look back on this project in the future.

    Author

    Note: Delete this note and add/remove/edit lines above based on what links you’d like to share.

    Acknowledgments

    This is where you can give a hat tip to anyone who helped you out on this project. Perhaps you worked in a team or got some inspiration from someone else’s solution. This is the perfect place to give them some credit.

    Note: Delete this note and edit this section’s content as necessary. If you completed this challenge by yourself, feel free to delete this section entirely.

    Visit original content creator repository https://github.com/yellowflash2041/huddle-landing-page-with-alternating-feature-blocks