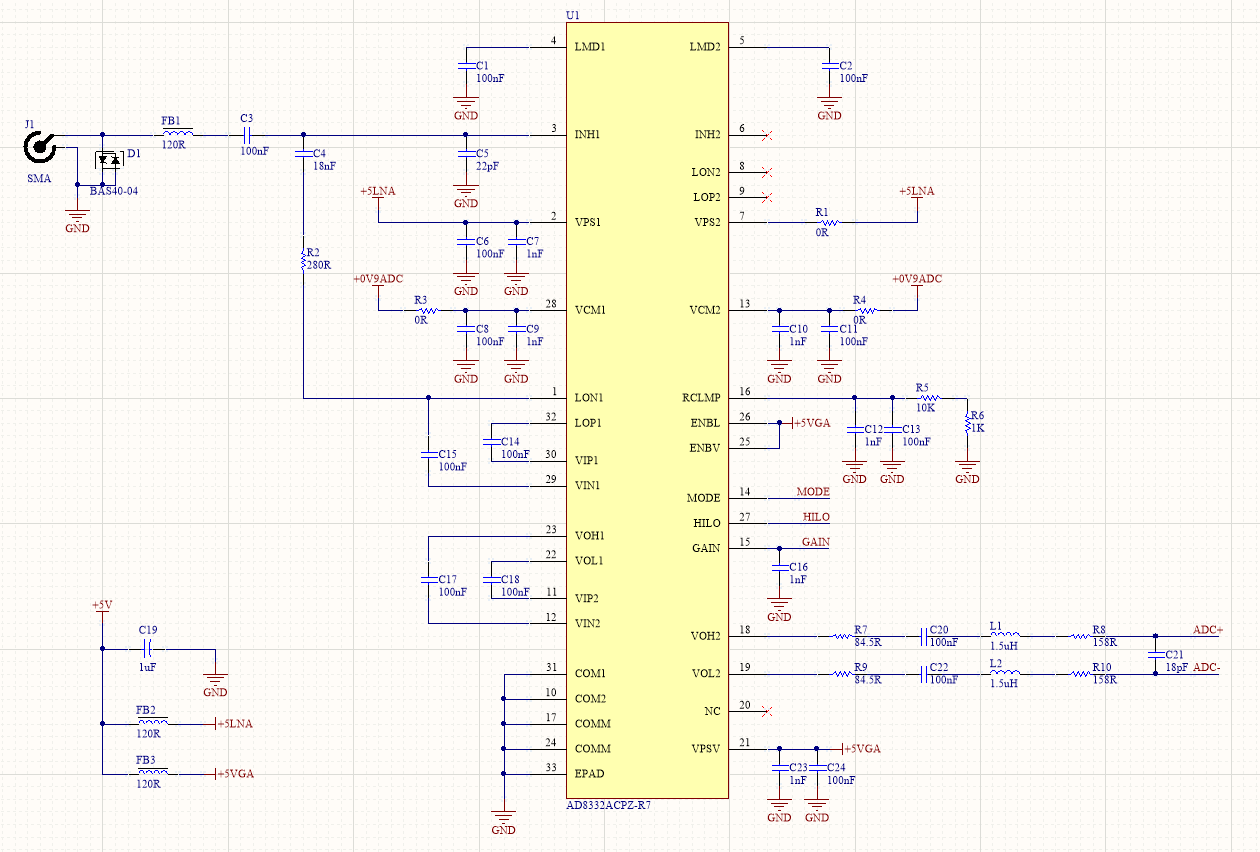
Changing filter components is more or less “easy”. Two places contain footprints for filters, one on the input and another on the output to the ADC.
The input filter has three 1206 footprints (one in serial and two in parallel to input signal).
The output filter is a bit more complex (20MHz LPF) and composed out of 0603 SMD parts. Those are also easy to replace with an air solder station and tweezers.
 ------------------------------------------------------------------------------
| SPDX-FileCopyrightText: 2020 Jorge Arija, Luc Jonveaux                       |
| SPDX-License-Identifier: CERN-OHL-S-2.0                                      |
|                                                                              |
| This source describes Open Hardware and is licensed under the CERN-OHL-S v2. |
|                                                                              |
| You may redistribute and modify this source and make products using it under |
| the terms of the CERN-OHL-S v2 (https://ohwr.org/cern_ohl_s_v2.txt).         |
|                                                                              |
| This source is distributed WITHOUT ANY EXPRESS OR IMPLIED WARRANTY,          |
| INCLUDING OF MERCHANTABILITY, SATISFACTORY QUALITY AND FITNESS FOR A         |
| PARTICULAR PURPOSE. Please see the CERN-OHL-S v2 for applicable conditions.  |
|                                                                              |
| Source location: https://github.com/kelu124/ft600/                           |
|                                                                              |
| As per CERN-OHL-S v2 section 4, should You produce hardware based on this    |
| source, You must where practicable maintain the Source Location visible      |
| on the external case of the Gizmo or other products you make using this      |
| source.                                                                      |
 ------------------------------------------------------------------------------
Applying Singular Value Decomposition to bitmap images (experimenting with compression)
Loads a bitmap image into an image matrix
Applies SVD
Lets user choose the amount of singular values to be included in the compressed image
This demo uses:
The C++ Eigen library for matrix functions (all header files included in solution)
The Chili DirectX Framework for the putpixel calls & graphics window
Demo:
Visualizes the increase in rank r (i.e. how many singular values are used to build the compressed image matrix)
The composite matrix is the sum over r of: r’th left singular vector * r’th singular value * r’th right singular vector
Note:
The essence of the code is in “SurfaceMat.h” (Surface is the type that holds the original sprite):
SurfaceMatrix(Surface& surf)
{
// Define A using Eigen matrix type for floats
MatrixXf A(surf.GetHeight(), surf.GetWidth());
// Fill Matrix with image information (convert RGB to GreyColor)for (size_t y = 0; y < surf.GetHeight(); y++)
{
for (size_t x = 0; x < surf.GetWidth(); x++)
{
auto r = surf.GetPixel(x, y).GetR();
auto g = surf.GetPixel(x, y).GetG();
auto b = surf.GetPixel(x, y).GetB();
float avg = (r + g + b) / 3.0f;
A(y, x) = avg;
}
}
// Perform SVD decomposition
JacobiSVD<MatrixXf> svd(A, ComputeThinU | ComputeThinV);
// Fill the vector Mvec (class data member) with composite matrices with increasing rank
Mvec.push_back(svd.matrixU().col(0)* svd.matrixV().col(0).transpose()* svd.singularValues()(0));
for (int i = 1; i < maxResolution; i++)
{
Mvec.push_back(Mvec[i - 1] + svd.matrixU().col(i) * svd.matrixV().col(i).transpose() * svd.singularValues()(i));
}
...
}
Conway’s Game of Life implemented in ClojureScript
Conway’s Game of Life is a cellular automaton created by the mathematician John Conway. It has four simple rules:
Any cell with fewer than two neighbors dies
Any cell with two or three neighbors lives
Any cell with more than three neighbors dies
Any unpopulated cell with exactly three neighbors becomes populated
For more information on the Game of Life, check out the Wikipedia article.
Quil is a Clojure/ClojureScript library for creating interactive art. It is based on the Processing language.
Usage
Run lein compile and open index.html in your browser.
For interactive development run lein cljsbuild auto. This command will recompile cljs to js each time you modify core.cljs and you can see result immediately by refreshing the page.
The game starts in a paused state with no cells. Left-click on a cell to populate it. Right-click on a populated cell to depopulate it. You can click-and-drag to populate or depopulate multiple cells. When you have configured the game you way you want, press the play button and see what happens! The slider controls game speed.
License
Copyright 2018 Jeremy Dormitzer
Permission is hereby granted, free of charge, to any person obtaining a copy of this software and associated documentation files (the “Software”), to deal in the Software without restriction, including without limitation the rights to use, copy, modify, merge, publish, distribute, sublicense, and/or sell copies of the Software, and to permit persons to whom the Software is furnished to do so, subject to the following conditions:
The above copyright notice and this permission notice shall be included in all copies or substantial portions of the Software.
THE SOFTWARE IS PROVIDED “AS IS”, WITHOUT WARRANTY OF ANY KIND, EXPRESS OR IMPLIED, INCLUDING BUT NOT LIMITED TO THE WARRANTIES OF MERCHANTABILITY, FITNESS FOR A PARTICULAR PURPOSE AND NONINFRINGEMENT. IN NO EVENT SHALL THE AUTHORS OR COPYRIGHT HOLDERS BE LIABLE FOR ANY CLAIM, DAMAGES OR OTHER LIABILITY, WHETHER IN AN ACTION OF CONTRACT, TORT OR OTHERWISE, ARISING FROM, OUT OF OR IN CONNECTION WITH THE SOFTWARE OR THE USE OR OTHER DEALINGS IN THE SOFTWARE.
If you already have the raw Katana tar/zip downloaded from the Foundry’s
website, place it inside the (extracted) repository folder without renaming it.
Then rez build --install should skip re-downloading the Katana tar/zip.
Licensing
If you already have a license server setup, e.g. at the port and address
1234@licenseserver, you can run Katana like:
There are many ways to go about setting up licenses for rez packages e.g.
Modify this rez package build to include your own custom katana
launcher script which sets up your licenses
Have a separate licenses rez package to handle licenses used by your
studio.
This can then be added as a requirement e.g. requires = ["licenses"]
Which method you go by will depend on your current situation.
Maintenance
Whenever new official release come out, update the __version__
in package.py then re-run rez build --install.
If you decide to make another install, e.g. new commands() environment
setup, you can instead just update the +local. version number to indicate
new releases/versions of your own. See PEP 540 local version segments.
Also, you can rename +local. to something more relevant to you
e.g. +mystudio. or +mygithubname.
cmd_proc — simple command processor for a register interface
FPGA designs of any complexity can have many parts that need settings, that
provide results, or must be controlled. A register interface is a very
convenient way to read and write settings, to preload counters, or to reset
and trigger subsystems. All registers and ‘actionable items’ in the user
logic are given an address, and these addresses can be read/written with a
single interface. We will call this the command interface.
Any suitable frontend can be used for the command interface. Typically this
will be a UART, like the fluart that was designed hand-in-hand with cmd_proc. Any other interface (SPI, I2C, …) can work
als well, as long as it is byte-based. cmd_proc only works with
octets on the command side.
On the side of the user logic, one address bus, a read data bus and a write
data bus are needed. The size of the address and data buses can be specified
as a generic. The two data buses are the same size. Both sizes must be
multiples of 8 bits. Reads and writes are each acknowledged with a
single-cycle strobe on their respective control signals.
Protocol
Four commands are supported by the cmd_proc: read and write, each
in ASCII (readable text) and binary formats. The ASCII commands are suitable
for use with a terminal program, allowing you to control the FPGA simply by
typing. Both input and output are readable strings. When under program
control, the binary commands are probably more convenient. Here, the bytes
are not translated to hexadecimal characters as they are with the ASCII
commands, but used as-is.
The format is always the same:
a single character indicates the type of command;
the address specifies which register must read or written;
a read command returns the data, while a write command specifies what must
be written.
For simplicity, the command processor does not support backspacing or
history. You could set your terminal emulator to line-buffered to solve the
first issue. Also, there is no remote echo. That means you will have to turn
on local echo if you want to see what you’re typing. This is because the
command processor does not know whether you’re sending text or binary
commands. It would be unusual to echo back binary data.
ASCII read
The command has the form raaaa\n, where r or R
indicates the ASCII read, and aaaa are the address bytes. The
internal address buffer is initialized to 0. Any bytes specified in the
command are shifted in from the right; any remaining leading bits will
be 0. For example, if the address bus is 16 bits wide, four characters
are needed to fully specify an address. To read from address 0x1234, the
command would be r1234\n. To read from address 0x12, r12\n is sufficient. To read from address 0, just type r\n. When more bytes are given than the width of the address
bus allows, the older ones simply drop out of the buffer: r123456\n will read from address 0x3456 in our example. A line
feed character (LF, ASCII 10, 0x0a, ctrl-J) or carriage return (CR,
ASCII 13, 0x0d, ctrl-M) ends the command. The often-used combination
CR/LF (0x0d/0x0a) is also valid, since extra bytes are ignored. Pressing
escape (ESC, ASCII 27, 0x1b, ctrl-[) aborts the command at any time (if
not captured by your terminal emulator). Any whitespace in the command
string is ignored, so if you prefer sending r 12 34\n, that
will work. The hexadecimal bytes are case-insensitive.
The response will consist of hexadecimal bytes only. Leading zeros
are not suppressed. The response is ended with a line feed character
only. You may need to set your terminal emulator to translate this to
CR/LF.
ASCII write
To write data dd to address aaaa, issue the command waaaa,dd\n. The same rules apply as for the read command: all
characters are case-insensitive. Everything except valid hexadecimal
characters, comma (ASCII 44, 0x2c), line feed and carriage return is
ignored, allowing you to pipe in nicely-formatted strings. Address and
data buffers are initialised to 0. Address and data bytes are filled
from the right, extra bytes drop out on the left. Escape aborts. The
write command gives no response.
Binary read
A binary read is started by sending a null byte (NULL, ASCII 0, 0x00).
The command processor now assumes that you know what you’re doing, because
the following bytes are used directly as the address. The right number of
bytes must be supplied: one for an 8-bit adress, two for a 16-bit address
and so on. The command does not have to be terminated. There is no way to
abort the command.
The response is issued as an unterminated string of binary bytes.
For example, a 32-bit data bus would result in four bytes, with the most
significant byte sent first.
Binary write
A binary write starts with a binary 1 byte (SOH, ASCII 1, 0x01). The
address and data bytes follow without separator and without ending. The
right number of address and data bytes must be supplied. Most
significant bytes go first.
Specify the bit widths of the internal address and data bus, respectively.
Any size is allowed, as long as it’s a multiple of eight. The model is
based on byte (octet) transfers only.
clk and reset
The system clock and reset. The cmd_proc is a synchronous
design, acting on the rising edge of the clock input. Reset is
synchronous as well and is active high.
The UART interface is designed for the exquisitely suitable fluart, also on this repository.
rx_data and rx_data_valid
Upon reception of a valid word (i.e., start bit low and stop bit high), rx_data_valid must be high for one clock cycle. The data on rx_data will then be latched.
tx_data, tx_req and tx_busy
tx_req is set high for one clock cycle to transmit tx_data. tx_busy is assumed to be high while a
transfer is in progress. All activity will be halted while waiting for
the interface to be ready; there is no timeout. The fluart‘s tx_end signal is not used.
The signals controlling the user logic are kept as generic as
possible. An example of the typical usage is also in this repository, as
explained below.
address, rd_data and wr_data
The address, a std_logic_vector having ADDR_SIZE bits,
is always sourced by cmd_proc. It is part of the command
received on the command interface. In response to a read command, rd_data is the data from the user logic, after any address
decoding. When a write command is received, the data to be written will
be on wr_data. The two data buses are both DATA_SIZE
bits wide. There is no slicing or shifting done in the cmd_proc, since it has no knowledge of what will be done with
the data in the user logic.
read_req and write_req
In many cases, the data to be read will be selected using an asynchronous
multiplexer. As long as it is done within a clock cycle, the output is
valid. There may be cases, however, where it is convenient to know when
the data is read. The read_req signal is provided for this
purpose. When writing data, a strobe is indispensible. The write_req signal indicates that the data on wr_data
are valid.
Language
For convenience, the model uses features from the VHDL2008 standard. The all keyword saves a lot of typing and bookkeeping for non-clocked
(asynchronous) processes. VHDL2008’s maximum is not supported by
Quartus yet, although all simulators understand it and the function is only
used at compile time. A similar function is given instead.
Quite some thought went into the hexadecimal-to-binary and
binary-to-hexadecimal converters. The case statements reduce to less logic
than typecasts and calculations.
Simulation
A testbench is supplied in cmd_proc_tb.vhdl. There is no serial
port; the interface is exercised directly. The address and data buses are
both 16 bits wide. The four supported commands are given in this order:
ASCII read, binary read, ASCII write, binary write.
Use your preferred simulator. For GHDL, the
following commands are sufficient:
You’ll find a synthesizable example in example_top.vhdl. The
command processor is set up for a 16-bit address bus and a 32-bit data bus.
Both are seriously oversized for the purpose, but it shows the flexibility.
A serial interface is provided, with the system clock frequency set to 50MHz
and the bit rate to 115.2kb/s. The fluart was designed for this
purpose.
The addres layout is as follows:
address 0 (0x0000)
Always reads the constant 32-bit value 0x01020304. Writes are ignored.
Use it to check the endianness of the receiving program. The most
significant end is transmitted first.
address 1 (0x0001)
The lower 8 bits of the data word written to this address are placed on
output pins. Connect these to your status LEDs. The current state of the
pins can be read back from the same address.
address 2 (0x0002)
This is a 32-bit scratch register that can read and written. The
contents have no effect; it’s storage only.
address 256 (0x0100)
This is a 32-bit counter that is incremented by one on every system
clock cycle. Writes have no effect. If you know the clock frequency,
this allows you to assess the performance of the system.
Simplicity
…is a goal in itself. If you have suggestions to simplify the logic and/or
improve readability of the VHDL, let me know! There are too many style
preferences to keep everyone happy, so please don’t focus on indentation,
naming etcetera. Live and let live.
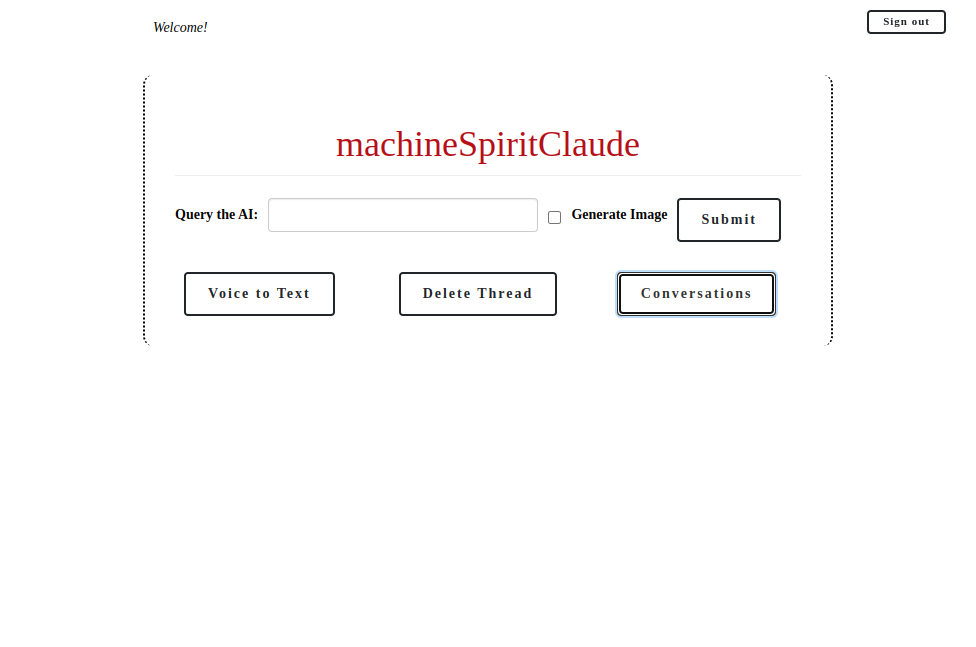
machineSpiritClaude: A Conversational Assistant Interface
machineSpiritClaude is a web-based conversational assistant interface designed to help users with their questions and requests. Built using Ruby on Rails and powered by the Chat GPT 4 large language model, machineSpiritClaude provides an intuitive and engaging way to interact with AI, along with practical features to make this interaction fruitful.
This is a progressive web app, and can be installed on near any machine, including Android phones, Unix and Windows-based computers, etc.
machineSpiritClaude is here to make working with AI easy; a simple and clean interface, great tools and features to make working with an AI practical and not a novelty.
machineSpiritClaude offers a variety of features to ensure a seamless and engaging user experience:
AI Image Generation using the Stable Diffusion API
Text-based conversation: Users can engage in a text-based conversation with the AI-powered language model to get answers to their questions or receive help with their requests.
Voice-to-text input: machineSpiritClaude supports voice-to-text input, enabling users to interact with the application by speaking their queries or commands.
Downloadable PDFs: Users can download the latest response from the conversation as a PDF document for easy reference and sharing.
Read-Response-Aloud: with the press of a button, the application will read the response from the AI aloud to the user
Email Responses: with the press of a button, the application will open your default mail client with the body populated by the response from the AI
Contributing
We welcome contributions to improve machineSpirit Claude and make it even more useful for users. If you have any ideas, suggestions, or bug reports, please feel free to open an issue or submit a pull request. We appreciate your help in making machineSpiritClaude a better interface with this conversational assistant.
License
machineSpiritClaude is private software.
Author
machineSpiritClaude was developed by Christopher Bradford. If you have any questions or would like to get in touch, please contact him at ai@machinespiritclaude.com.
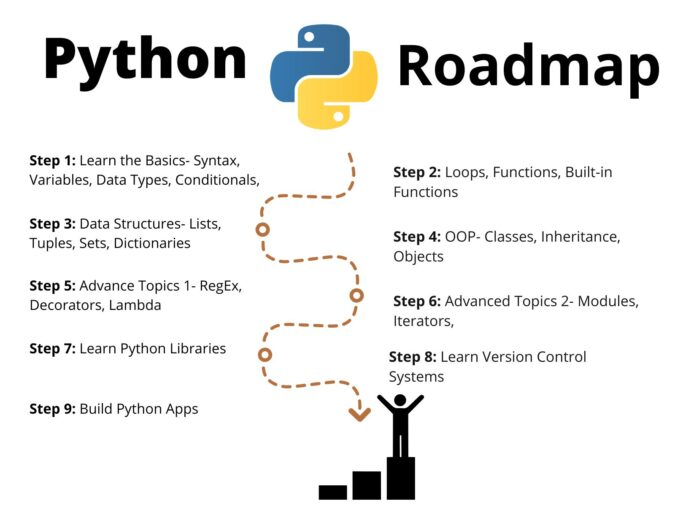
Python is a high-level, versatile programming language known for its readability and simplicity. It has a vast community and is widely used in various fields, including web development, data science, machine learning, automation, and more. This roadmap is perfect for beginners and anyone looking to solidify their Python skills.
🛠️ How to Use
The project is organized into separate sections for each day, making it easy for you to follow along. Each day focuses on specific topics and provides practical examples and exercises to reinforce your learning. To navigate through the content, you can either explore the filenames or refer to the main “README.md” file. For instance, to access the content for Day 4-6, simply open the “Day 4-6.md” file.
📁 Course Content
—-> Days 1-3: Basic Concepts and Installation
Understand Python’s introduction and why it’s popular.
Learn the basic syntax of Python and its core data types (string, integer, float, list, tuple, dictionary).
Install Python on your computer.
—-> Days 4-6: Conditional Statements and Loops
Master conditional statements (if, elif, else) and logical operators.
Gain proficiency in using loops (for and while).
—–> Days 7-10: Data Structures
Deepen your knowledge of data structures like lists, tuples, and dictionaries.
Practice working with data structures through hands-on exercises.
—–> Days 11-14: Functions and Modules
Define and utilize functions in Python.
Explore basic Python modules (math, random, datetime).
—-> Days 15-18: File Handling and Error Handling
Learn the art of file reading and writing.
Master error handling techniques using try-except blocks.
—–> Days 19-22: Object-Oriented Programming (OOP)
Understand classes and objects.
Dive into OOP concepts, including inheritance and polymorphism.
—-> Days 23-26: Database Connection and SQL
Establish connections with databases (e.g., SQLite).
Learn to execute basic SQL queries for data manipulation.
—-> Days 27-30: Web Development and Frameworks
Explore Python web frameworks like Flask and Django.
Create a simple web application and gain insights into web development.
—-> Python Projects
you’ll find a collection of practical Python projects to help you apply your programming knowledge and build useful applications.
Simple Notepad Application
At the end of the day, you will develop a project to reinforce your Python learning.
Improve your file manipulation, user input and basic data management skills by creating a simple Notepad application
Dictionary Application
At the end of the day, you will develop a project to reinforce your Python learning.
Improve your file manipulation, user input, and basic data management skills by creating a Dictionary application.
Random Password Generator
Create a random password generator program using Python.
Allow users to specify password length and character set preferences.
Provide the option to save generated passwords to a file.
Bank Application
A Python program that simulates basic banking operations.
Users can create accounts, log in, check balances, deposit and withdraw money, and transfer funds securely.
Enhance your Python skills, database management, and security knowledge.
Weather Application
A Python program that provides real-time weather information for a specified city.
Users can input a city name and receive data such as temperature, humidity, weather description, and wind speed.
Enhance your Python skills, work with external APIs, and retrieve live weather data.
To-Do List Application
A to-do list application that allows users to manage their tasks and stay organized with a command-line interface.
Practice creating and managing tasks, marking them as completed, and organizing your to-do list efficiently.
Vehicle Rental Application
A vehicle rental application that enables users to rent and manage vehicles, making use of a secure login system and database storage.
Implement user registration, vehicle addition, rental management, and secure login features while working with a database.
📋 Course Structure and Preparation
Before diving into this roadmap, here’s a suggested course structure:
Daily Learning: Dedicate time each day to go through the topics and complete the exercises.
Hands-On Practice: Apply what you learn by working on coding exercises and mini-projects.
Revision: Regularly review previous days’ content to reinforce your knowledge.
Exploration: Beyond this roadmap, explore other Python libraries and projects that interest you.
By following this structured approach, you’ll gradually build your Python proficiency and gain confidence in your programming skills.
💰 Support the Project
If you find this project helpful, please consider supporting me. Your support allows me to dedicate more time and effort to creating useful projects like Python30Days and developing new tools and resources. By contributing, you’re not only helping improve existing tools but also inspiring new ideas and innovations. Thank you for your support! Together, let’s continue building and learning
Happy coding, and enjoy your Python learning journey!
It is a library for simple data processing. sdp is inspired by array, vector, bytestring, containers and repa. sdp is focused on efficiency,
openness and simplicity.
Motivation
Originally sdp was created as array replacement. Now its main purpose was to
provide the most comfortable interface for working with various data structures:
eliminate name conflicts with other libraries and between them, simplify their
interaction, make code even more versatile and reusable.
Structures
All predefined structures are based on pseudo-primitive types SArray#, SBytes#, STArray#, STBytes#, MIOArray#, MIOBytes# that encapsulate
real primitives with correct size and offset.
sdp uses templates to define more complex structures:
AnyBorder adds explicit boundaries of arbitrary type
AnyChunks defines an unrolled list of given elements
Based on pseudo-primitives and templates, the following are defined:
immutable arrays with immutable explicit immutable boundaries: Array and Bytes
mutable arrays with immutable explicit immutable boundaries: STArray and STBytes, MIOArray (IOArray) and MIOBytes (IOBytes)
immutable unrolled lists with immutable implicit boundaries: Unlist and Ublist
mutable unrolled lists with immutable implicit boundaries: STUnlist and STUblist, MIOUnlist (IOUnlist) and MIOUblist (IOUblist)
immutable unrolled lists with explicit immutable boundaries: Unrolled and ByteList
mutable unrolled lists with explicit immutable boundaries STUnrolled and STByteList, MIOUnrolled (IOUnrolled) and MIOByteList (IOByteList)
Classes
sdp generalize the most popular operations on linear (list-like) and
associative data structures including selection, splitting and sorting. With sdp list functions aren’t overlap their counterparts for other structures.
Nullable is a service class of structures with null values.
Bordered is a class of structures with borders and finite number of elements.
Estimate is a service class for efficiently (at least, in finite time)
estimating the length of a structure or compare pair of structures by length (in
finite time if at least one of them is finite). Allows to express such
conditions as:
xs .<. ys -- length xs < length ys
es .== 10 -- length es == 10
es .>   5 -- length es > 5
Unboxed is a service class that simplifies interacting with data stored in
ByteArray# and MutableArray#. Used in containers that based on SBytes#, STBytes# or IOBytes#.
Shape is a service class for dimension operations and finite-dimensional
index transformations. Index is a service class that generalizes Enum to
interval operations, replaces Ix.
Linear is a class of linear structures that generalizes the standard list
functions. Split is Linear extension, which implements additional list-like
operations like split(At)takeWhile, isPrefixOf, etc.
Indexed is a class of indexed structures that generalizes read and modify
operations immutable structures.
Shaped is a class of operations on structures generalized by the type of
index. Provides safe change of range and index type, fast extraction of
subsequences.
Map is a class of operations on associative arrays (dictionaries).
Set is a class of operations on sets.
Zip is a class that generalizes zipping operations (see zip, zipWith, ZipList, etc.).
Scan is a class of convolutions with intermediate values.
Sort is a sorting class for immutable structures.
BorderedM, LinearM, SplitM, IndexedM, SortM – classes of operations
on mutable containers.
The MAJOR version of the derivative must match the smallest MAJOR version
of sdp with which it’s compatible.
Extensions should be called sdp-%extensionname% (e.g. sdp-quickcheck).
Wrappers should be called sdp4%libraryname% (e.g., sdp4text).
Using the SDP category
The SDP category is intended for sdp classes and primitives, as for
structures whose names are already taken in the Data category. It shouldn’t be
used instead of System, Control, Foreign, etc.
Contributing
For details of the process for submitting pull requests, please read CONTRIBUTING.md.
License
sdp is FOSS (free and open source software), you can redistribute it and/or
modify it under the terms of the BSD3 license. sdp is distributed in the hope
that it will be useful, but without any warranty, without even the implied
warranty of merchantability or fitness for a particular purpose. See the LICENSE
file for more details.


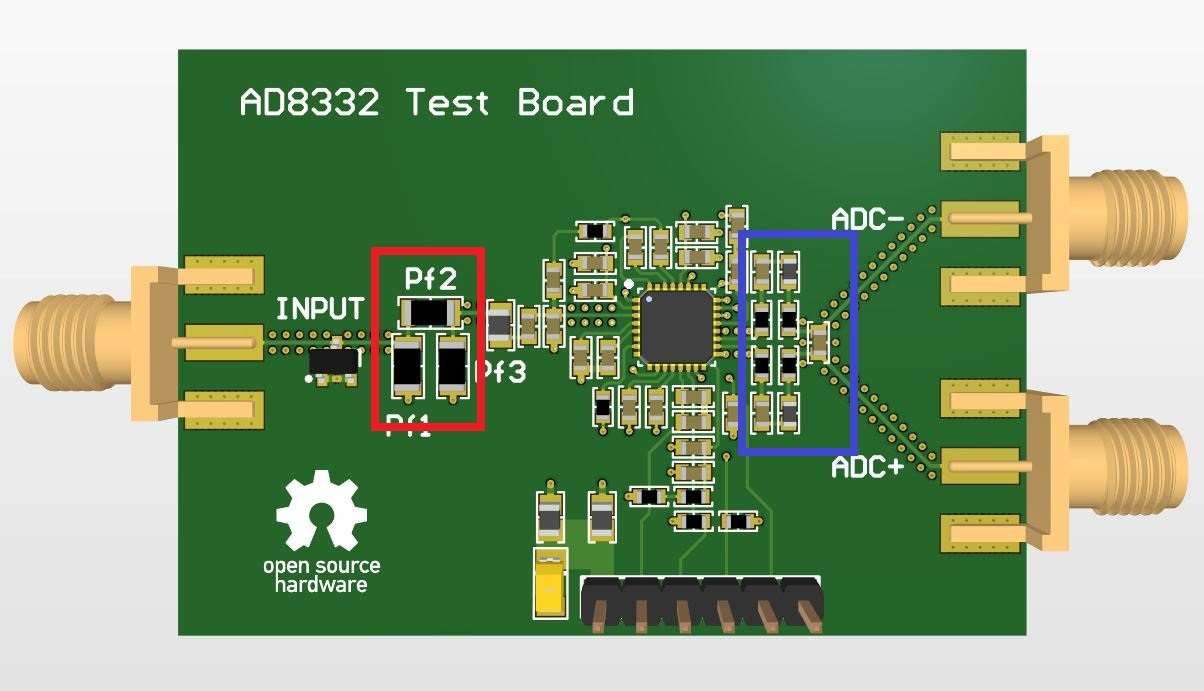


 https://github.com/kelu124/AD8332-devboard